Improving Finishing Operations with Circle Segment Cutters
Circle segment cutters are a concept in cutting tool design that allows for maximum production rates while still achieving excellent surface finish.
As machining capabilities become more and more sophisticated, mold manufacturers are moving towards machining parts as close to near net shape as possible in the milling process. Grinding and polishing can be time-intensive and expensive operations. The more we can shorten these processes, the more we drive manual work and cost out of an operation.
Traditionally, ball nose tools have been used to try and finish parts as close to near net shape as possible. This is accomplished by using the radius at the end of the tool and taking small step over tool paths to minimize the scallop to an amplitude that fits within the surface finish specification. The advantages of this approach are that it eases programming, makes it possible to reach deep into cavities and allows the inclination angle to be versatile. The main disadvantage of using this process is that it requires many tool passes, resulting in very high cycle times.
Another strategy is using a circle segment cutter (Figure 1) that comes in several different designs. The basic concept involves matching the tapered angle of the tool to the inclination angle at which the part is machined. This allows the use of a larger radius in the tool, which then machines a larger area while producing the same scallop size.
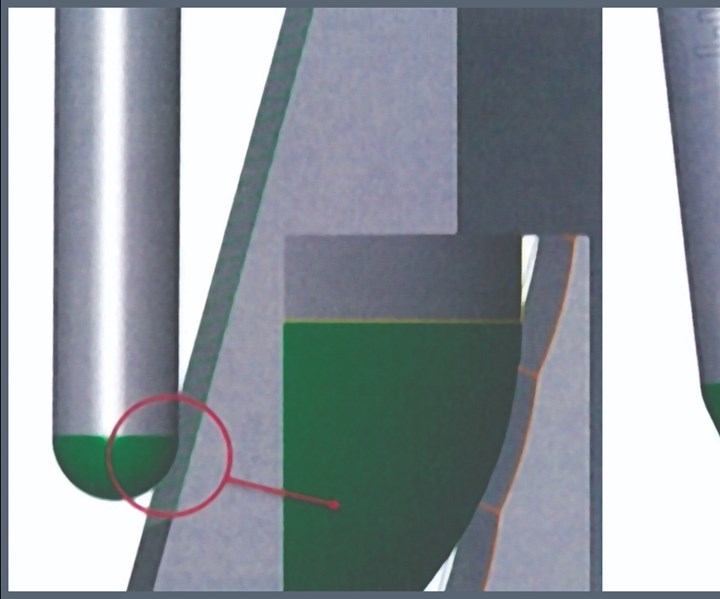
Figure 1. A circle segment cutter allows a larger step over compared to a traditional ball nose tool while still producing good surface quality. Figures courtesy of Walter USA.
Circle segment cutters require a CAM software package that can program their complex tool paths and allow the tool path to work with the tool design. Many of today’s most popular CAM systems already include packages for this machining strategy. It is also necessary to use a machine with at least five-axis capability that can incorporate the necessary tool paths.
Cutting It Down to Size
Here is a breakdown of the four main tool design concepts (Figure 2) that fall within this cutter category.
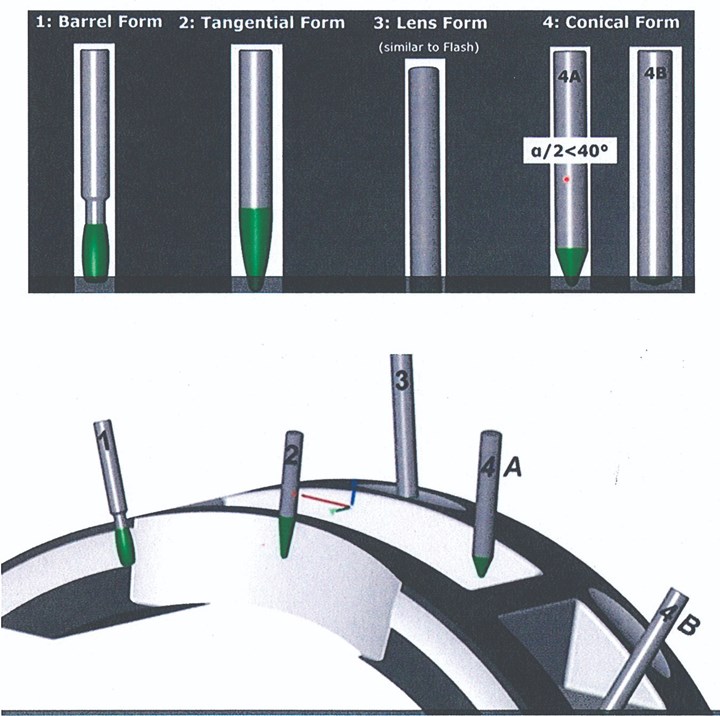
Figure 2. Barrel, tangential, lens and conical are four styles of circle segment cutters used in different applications.
- Barrel cutter. A cutter with a barrel shape is considered the first concept developed for this new machining strategy. The barrel shape allows a mold builder to machine surfaces that must be undercut and that do not require a finished cavity floor.
- Tangential form. A tangential form circle segment cutter incorporates a taper built into the tool and a ball nose style point. However, the taper is not a straight cutting edge; instead, it incorporates a radius of up to 90 mm. These tools are ideal for contoured surfaces.
- Lens form. The lens form tools have an extreme angle geometry on the end of the tool that allows a mold builder to machine contour shapes that are flat as opposed to pocket shaped.
- Conical form. Conical form cutters come in two types. The first type is for an inclination angle of fewer than 40 degrees. This tool is better suited for deep pockets and sloped surfaces. The second is for the larger inclination angles above 50 degrees. These tools are better suited for pocket floors and flatter surfaces. While the conical form tool may resemble tangential shapes, it can incorporate a much larger radius. These tools have a maximum effective radius of 500 mm versus the 90 mm of the tangential tools.
Point of Contact
The contact point between the tool and the part it typically in three different locations, with each one offering advantages and disadvantages (Figure 3).
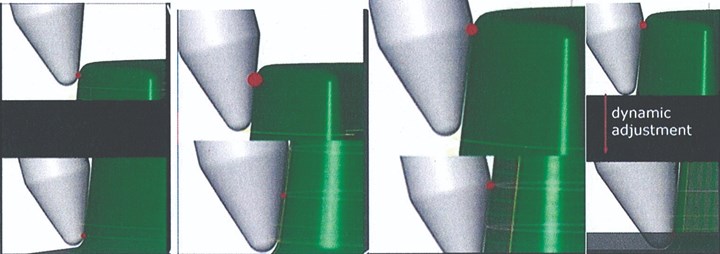
Figure 3. Although incorporating a dynamic contact point provides the best results, there are different options for using a contact point.
- The contact could be at the tangent point on the tip, the point where the ball nose intersects with the taper. This produces the lowest cutting forces during the finishing operation. However, it is also the weakest point and will tend to wear quickly or possibly chip, reducing tool life.
- The contact point can also be in the middle of the effective radius. In this position, the tool provides the most stable cutting edge but increases the cutting forces and prevents finishing of the sidewall to the bottom of the pocket. This contact point position will require additional rework in the pocket corners.
- The third contact point is the location where the effective radius transitions to the straight part of the cutting edge, or the end. This contact point reduces the amount of material at the transition point, providing excellent surface finish. It also allows complete engagement of the cutting edge on the first pass. However, additional offsets may be necessary.
The ideal contact point is a combination of all three, which utilizes a dynamic adjustment to the contact point. When the tool contacts the part, the end location is used; then as the tool feeds to the bottom of the contour, the contact point transitions to the middle. And, as the bottom of the contour is reached, the tip contact point is made.
A dynamic adjustment to the contact point ensures that the advantages of each contact point are used to the fullest and incorporates the entire cutting edge into the process.
Cutter in Action
The chart compares a ball nose tool with tangential and conical form circle segment cutters. The machined area was 10,000 mm2 (100 by 100) with a required surface finish of Rz=2 mm.
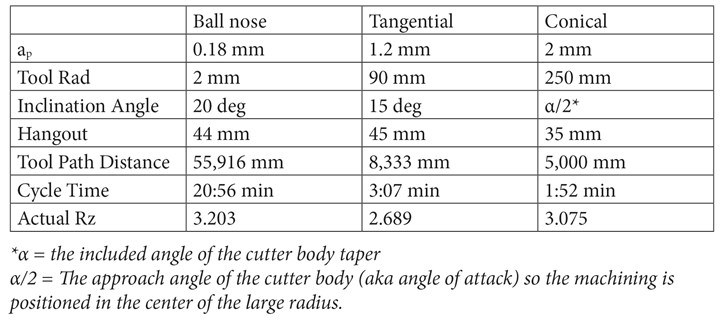
Chart. Larger tool radius increases the stepover distance (ap) and significantly improves cycle time.
A dynamic adjustment to the contact point ensures that the advantages of each contact point are used to the fullest and incorporates the entire cutting edge into the process.
The results show that the larger corner radius allows for a much larger stepover. In this case, the conical form tool had a stepover distance (ap) over 10x compared to the ball nose tool. This means more than a 10-time reduction in the overall tool path distance. Shortening the total tool path distance cut the cycle time by about 90% while still achieving a slightly better surface finish. The cutter shape also helped shorten the overhang distance, which helped improve rigidity and surface finish (Figure 4).
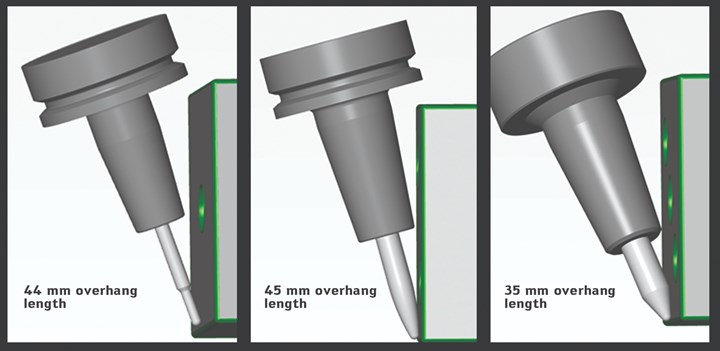
Figure 4. The shape of the cutter effects the inclination angle and overhang length.
Circle segment cutters require the mold builder to match the cutting tool design to the parts he is machining and to understand which inclination angle he will use to machine the parts. However, when it all comes together, a shop can dramatically reduce cycle times and production costs.
For More Information
Walter USA
800-945-5554
walter-tools.com/us
Luke Pollock is a product manager for Walter USA.
Related Content
Machining Center Spindles: What You Need to Know
Why and how to research spindle technology before purchasing a machining center.
Read MoreHow to Eliminate Chatter
Here are techniques commonly used to combat chatter and guidelines to establish a foundation for optimizing the moldmaking process.
Read MoreMaintaining a Wire EDM Machine
To achieve the ultimate capability and level of productivity from your wire EDM on a consistent, repeatable and reliable basis, regular maintenance is a required task.
Read MoreMachine Hammer Peening Automates Mold Polishing
A polishing automation solution eliminates hand work, accelerates milling operations and controls surface geometries.
Read MoreRead Next
A Strategy for Better Mold Finishes
Combining advanced tool geometry and complementary CAM tool paths can reduce finish cycle times and improve surface quality.
Read MoreRunning Circles Around Milling Challenges
Circle-segment end mills can greatly improve five-axis mold prefinishing and finishing operations.
Read More.png;maxWidth=970;quality=90)








.png;maxWidth=300;quality=90)

