Why You Need to Inspect the Part to See the Mold
In the simplest terms, a good mold is one that makes good parts. When your customer is making good parts, no one questions the mold. It’s when the parts are not meeting spec that the mold—as one of the main elements of the molding system—is called into question. In these situations, one common proposal is to measure the mold to ensure that it conforms to the designed dimensions.
While measuring the mold can be both useful and necessary, this approach poses certain problems:
- It is difficult to quickly and easily measure a mold due to its often large size and weight. This can create a prolonged period of costly downtime.
- Most molds do not have their own direct dimensional specs; rather, their design dimensions are derived from the specifications of the parts they are designed to mold and it is often the moldmaker, and not the end customer, who is responsible for designing the mold. For this reason, determining if a mold was manufactured according to spec provides only a partial answer to the question of why parts are not meeting spec.
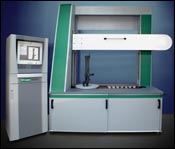
There is an alternative method of determining mold dimensional suitability: an industrial 3-D laser scanner (see Photo 1) to conduct a detailed inspection of the molded parts. In just a few minutes, the scanner collects millions of data points, measuring the complete part both quickly and accurately.
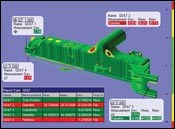
The large density of data makes it possible to see the measured part and compare it directly to the CAD model. The scanned image of a radiator tank shown in Photo 2 illustrates how clearly deviations can be seen when the scanned data is compared to the CAD model using 3-D analysis software.
This approach enables design engineers and process engineers to obtain the information they need to determine the cause of the problem in a way that tables of data generated by coordinate measuring machines (CMM) simply cannot provide.
In fact, the high data density may suggest a completely different cause of the problems other than the mold—such as problems with raw materials or a flaw in the molding process. And if the problem does lie with the mold, an industrial 3-D laser scanner will pinpoint the location.
Related Content
-
Technology Roundup: New/Improved Technologies You Don't Want to Miss
With all the technology joining the market, moldmaking is a versatile, ever-evolving industry. As such, this technology roundup has no specific theme — it features a variety of products for applications and solutions across the industry.
-
2024 Moldmaking Insights: A Year in Review Part 1
A look back at the top moldmaking trends of 2024, as revealed through MMT's analytics. This review highlights the most popular technical articles, case studies, tips and best practices that captured the industry's attention over the past year.
-
Four Micro Tooling Considerations
Issues involving gating, ejection, mold splits and direction of pull are of special concern when it comes to micro tooling.


