Using Digital Thermography in Mold Manufacture
Digital thermography is an effective tool for bringing solutions to your customers.
If your business has never used digital thermography, or if you’ve dabbled with it and weren’t satisfied with the results, or haven’t really kept up with the technology, it’s time to look again with a fresh set of eyes.
When it comes to getting a tool up and running, or if you’re in the midst of a troubleshooting exercise, it’s time to move fast, and it’s time to remove the blame game from the conversation. Digital thermography is one of the best tools touse for quickly getting to the root cause of a molding issue.
In politics, the old saying is that whenever there’s a scandal with your name on it, hang a lamp on it. By the same logic, if there’s a problem with a tool or manifold under your responsibility, take a picture of it with an infrared camera (IR).
There are hundreds of different situations where the speedy generation of useful data that thermography can bring can save you and your customers time and money. There are both technology and business drivers that are accelerating the use of thermography in the plastics business and it’s worthwhile to discuss them.
The Technology and the Business
From a technology standpoint, recent advances in IR cameras permit imaging from single up to multiple-dozens of frames per second, a capability that shows in detail exactly what happens as a mold and its parts heat up and cool down. IR cameras are also increasingly compact, with some small enough to be literally pocket-size. IR cameras are now reasonably priced ($3,000 to $12,000 price range) and are readily available from a wide range of suppliers. Equipment cost isn’t really an issue any more.
From business standpoint: a basic thermography function is to help improve productivity during troubleshooting operations, and wherever possible to eliminate or minimize the need for a costly mold teardown.
For example, if a molder has a large 30-drop manifold system that would normally take 12 hours to take apart, and thermography helps get to root cause so we can move confidently in 2 to 3 hours to determine what needs to be fixed, that’s money saved. The savings that result from this productivity are significant enough to make a difference in the bottom line of a molder. As a mold manufacturer or manifold supplier, when you can bring that productivity to your customer, no matter what the issue is or even whose fault it is, you can move past the blame game and become an even stronger member of the team.
Market Drivers
You can use IR cameras to record thermal profiles of a mold powered up and the parts it produces. Ideally, there will be mold-flow data you can use to compare to the IR images. However, many times, this isn’t available and it’s a growing problem.
Through the transfer of so much tooling in North America, both internally as well as internationally, much of the history and good data for each of those tools may be missing, even lost permanently. When molders and moldmakers inherit these tools, the issue is how best to get them up and running as quickly and cheaply as possible and to get them producing good parts.
A thermal audit, as part of a complete tool audit, makes sense when you’re trying to get these tools up and running. Thermography is a great communications tool that provides useful information to not only technical/processing-savvy types, but also to those individuals who have to make major financial decisions about these tools and their potential effect on their company and its operations.
The second market driver for digital thermography is when time is money—for example, when problems occur in day-to-day molding operations, digital thermography is a useful, practical tool. The objective is reducing the number of hours it takes technicians to diagnose and fix a problem.
Whenever there is a problem with the molding operation, it’s typically the moldmaker and the manifold supplier who are called to account, no matter what the issue seems to be at first blush. Two common problems are (1) a nozzle tip with a bad mold interface or (2) incorrectly assembled manifold systems.
Poorly installed manifolds can and sometimes do originate with suppliers, but often in a bad economy the problem begins in-house. When costs are tight oftentimes toolmakers build the manifold housing or assemble their own manifold systems. The problem that most often crops up when there’s a problem with these kinds of systems is that they will be improperly wired.
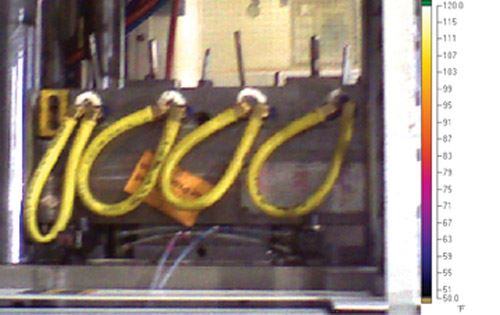
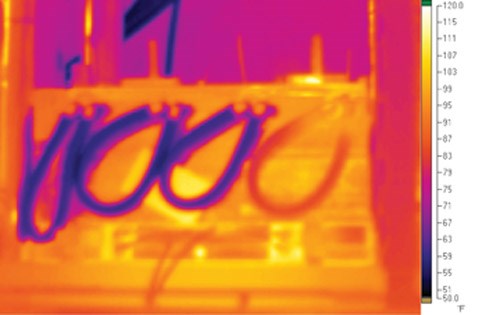
Other common problems include inadequate, poor—or sometimes missing altogether—water connections. There will be a section of a mold or insert that doesn’t cool properly and negatively affects cycle time. Many times you can shoot a camera at the press and look at the water loops on the side and identify where they aren’t hooked up properly. Molders will say they had a leak, the connection wasn’t drilled deep enough or there is a bad circuit. Since there is no money in the budget to repair the mold, they accept the scrap rate and lost cycle time.
On complex valve-gated tools that have multiple drops—and there are cylinders direct-mounted onto the manifold system—a thermal imaging camera serves as a very fast way to identify whether or not there are blockages in the water lines to the cylinders that will cause seal failure in the cylinders.
Thermography is one of the quickest and easiest ways to identify these kinds of issues, and so many times you can save several hours in the troubleshooting process and identify problems that can be quickly remedied.
Bringing Solutions to Your Customers
So, let’s look at the market environment in which we operate. Margins are tight for everyone, and the need for knowledge, speed and productivity has never been greater, especially when something goes wrong. If you don’t bring it, maybe your competitor will. Digital thermography is one of the best tools for bringing solutions to your customers. If you have a camera, use it. If you don’t have one, now is the time to invest
Related Content
How to Eliminate Chatter
Here are techniques commonly used to combat chatter and guidelines to establish a foundation for optimizing the moldmaking process.
Read MoreSoft Wired: Cutting High Taper Angles with Wire EDM
Examine the wire’s properties to determine the right one for achieving the best cut.
Read MoreFundamentals of Designing the Optimal Cooling System
The right mold components can help improve mold cooling and thereby produce higher-quality parts.
Read MoreMaintaining a Wire EDM Machine
To achieve the ultimate capability and level of productivity from your wire EDM on a consistent, repeatable and reliable basis, regular maintenance is a required task.
Read MoreRead Next
3-D, Non-Contact Scanning for Inspection: Info for Moldmakers
Understanding the differences and similarities between CMM and 3-D scanning allows moldmakers to adapt to, apply and leverage 3-D scanning technology within their shop environment.
Read MoreReasons to Use Fiber Lasers for Mold Cleaning
Fiber lasers offer a simplicity, speed, control and portability, minimizing mold cleaning risks.
Read MoreHow to Use Continuing Education to Remain Competitive in Moldmaking
Continued training helps moldmakers make tooling decisions and properly use the latest cutting tool to efficiently machine high-quality molds.
Read More
