Part Three of a Three-Part Series Laser Beam Hardening: A Flexible Tool for Wear Protection
The development of a new laser beam scanning system for the heat treatment of tool steels and various metals.
During the last few years at Fraunhofer Institute for Material and Beam Technology (IWS) (Dresden, Germany) a new laser beam scanning system for the heat treatment of metals with high power diode lasers was developed. The new external scanning optics is an optional tool that can be used with common standard high power diode lasers (focal distance _ 300 mm). It works with high power diode lasers in the multi-kilowatt range up to 5 kilowatt laser power. The new system opens the door to a wide field of applications, such as heat treatment of metal surfaces with a track width of more than 50 mm at once.
Further improvements like real-time temperature control with cycle times in the range of microseconds ensure a reproducible hardening result even for complex 3-D–shaped parts with difficult heat flow conditions. Temperature-controlled laser beam hardening with high power diode lasers (HPDL) is state-of-the-art technology compared to CO2 laser beam hardening. The compact size of diode lasers, the high efficiency and the high absorption coefficients make the HPDL an ideal tool for laser beam hardening and other local heat treatment. Because there is no need for coatings (to absorb the laser power into the material), it is possible to measure the real surface temperature during the heat treatment process with pyrometers and to control the process.
Nevertheless, the beam shape of a HPDL beam is often not suitable to achieve the desired power density distribution or temperature field at the surface of the part, and the width of the hardening zone is limited by the spot dimensions. A lot of fix optics are available for this purpose, but often spikes in the intensity profile are detrimental to hardening applications. Furthermore, they cannot be adapted to the needs of the application. With standard fix optics the best utilization of available laser power is not possible in most cases, because the wrong aspect ratio of the nearly rectangular laser spot results in a lower width of the heat treatment zone and laser power is wasted in this way.
The objective of this development was to combine the advantages of laser beam scanning—well known for CO2 and Nd:YAG lasers—and the advantages of the HPDL beam technologies into compact HPDL laser optics.
Laser Scanning System Components
The system mainly consists of a flat 90-degree deflection mirror; high-speed pyrometer for temperature measurements; coated glass plate to reflect the temperature signal to the pyrometer; scanner with special scanning mirror for the diode wave-length range; air cooling nozzle to cool the scanning mirror; water cooling for flat mirror and scanner; and, software tools for creating scanning functions.
The optics was connected to a 4 kW HPDL. All mechanical components are made of aluminum and are water cooled to resist scattered laser light. The design of the optics is typical for this kind of Nd:YAG or HPDL optics. The main problem was finding a scanning mirror with high reflectivity for the combination of two different wavelengths (808 and 940nm) and 45 ± some degrees angle of incidence.
Different kinds of mirror materials (i.e. copper, fused silica) and coatings were tested successfully. Even for high scanning angles (i.e. ± 5°) the reflectance is about 99.5 percent. This means a loss of laser power of only 20 Watts, when a 4 kW HPDL is used. The low absorption factor on the mirror surface is a requirement for a long-term stability at full laser power.
Scanning Functions
To achieve a quasi-stationary temperature field on a metallic surface during heat treatment it is necessary to scan the scanning mirror with high frequencies (100-200 Hz). This requires a very powerful scanner with maximum peak power of more than 1,000 Watts, when non-sinusoidal scanning functions are available.
Temperature Fields
At first, the kind of temperature fields that can be generated as result of different scanning functions was tested. The temperature was measured coaxial to the scanned laser beam with a cycle time of 40 µs. A second possible variant also was tested. The temperature field was scanned by a second pyrometer scanning system. Both variants are working well and result in equal temperature distributions. To ensure a stable process over a longer period, a temperature-guided laser power control was applied.1 To detect the laser power density distribution directly, a camera system was used. To see just the intensity profile, the experiments have been conducted at low laser power and temperatures less than 200°C.
Software Development
To make handling of the laser scanning system easy, special software tools have been developed, including calculation of the optimum scanning function for given laser spot and desired spot size, and power density distribution; waveform generator to send scanning function to the scanner; measuring and recording of real scanning functions and temperature signal during the process; real-time, closed-loop temperature control (different options available, e.g. maximum temperature control); analysis of process data after hardening; and, fine-tuning of scanning functions based on real local temperatures. These software tools run on a standard-PC with a special I/O-card.
Heat Treatment of Stainless Steel
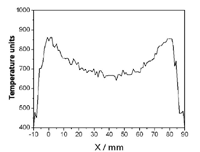
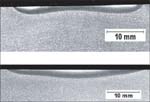
The heat treatment of stainless steel with high power diode lasers is quite difficult because the surface of the material reacts to maxima and minima of the laser spot intensity profile. So the intensity maxima near the edges of a sinusoidal scanned laser line results in temperature peaks at these positions. The hardening profile of this scanning function is suitable for special applications. (See Figures 3 and 4.)
In contrary to the sine function, a triangle scanning function gives a very different result. The maximum temperature was reached in the middle zone of the laser spot. Toward the edges of the laser spot the temperature decreases continuously because of laser power density distribution, heat conduction and surface oxidation effects. They contribute to an inhomogeneous distribution. As a result of the special temperature field, the hardness and the hardening depth decrease from the middle to the edges. To achieve a homogeneous hardening depth and hardness, an arbitrary scanning function with a characteristic between sine and triangle shape is used.
Heat Treatment of Carbon Steel
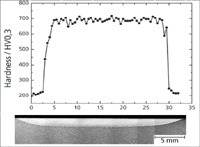
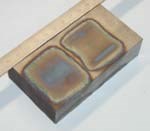
The result of the heat treatment of a large track with dimensions of about 200 mm x 27 mm is given in Figures 5 and 6. It shows that a homogeneous surface hardness and hardening depth is achieved by the application of different scanning functions.
Summary
External scanning optics for high power diode lasers was developed that opens the door to flexible multi-kilowatt laser beam hardening. Experiments with diode lasers up to 4 kW power have been successfully performed. It was shown that hardening of different steel grades is possible. The main advantage is the very high flexibility to adapt spot size and intensity profile to the needs of the hardening application. In comparison to standard fix laser optics, wider heat treatment tracks are possible. Special software tools make the control of the laser scanning system easy. A precise temperature control ensures the high quality of the heat treatment.2
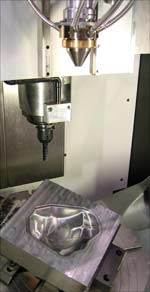
The system is available as a stand-alone solution (laser workstation for hardening and cladding) or it can be integrated in machining centers. The integration will shorten leadtime dramatically. Tools or parts can be finish machined (milling/turning + hardening) in one setup.
References
- Bonss S., Seifert M., Brenner B., Beyer E. "Improved temperature control for high precision heat treatment with high power diode lasers" The International Congress on Applications of Lasers and Electro-Optics, 2001.
- Seifert M., Bonss S., Brenner B., Beyer E. "High power diode laser beam scanning in multi-kilowatt range" The International Congress on Applications of Lasers and Electro-Optics, 2004.
Related Content
How to Achieve the Best Mold Finish
A look at factors that impact the polishability of tool steels and recommendations for obtaining a high-gloss finish.
Read More5 Hot Runner Tips for Moldmakers and Molders
Best practices for initial hot runner tryouts and effective preventive maintenance.
Read MoreLaser Welding Versus Micro Welding
The latest battle in finely detailed restoration/repair of mold materials.
Read MoreRead Next
Part Two of a Two-Part Series High Power Laser Technologies And Moldmaking
Using high power laser cladding for rapid tooling and tool repair.
Read MorePart One of a Three-Part Series Metal Laminated Tooling-Process Chain
Results from laminated tooling testing show that this technology has the capability for an enormous reduction in cycle time via the integration of a conformal cooling system.
Read MoreHow to Use Strategic Planning Tools, Data to Manage the Human Side of Business
Q&A with Marion Wells, MMT EAB member and founder of Human Asset Management.
Read More


