Last month I shared the first part of this embarrassing tale, which took us to the point of a scrap rate we could tolerate by a means we were not proud of and left us with the knowledge that we hadn’t fixed anything. And when you haven’t fixed anything (i.e., you haven’t performed a legitimate corrective action), you can bet it will come back to haunt you. The problem with the tool that I described was no exception. However, the haunting didn’t return in the same form. Instead it manifested itself in corollary problems.
I was going to begin by explaining that the first corollary problem was parting line flash, but then I remembered that prior to that a three-piece alignment lock had failed. In fact, it galled and pulled the male piece right out of the mold base. However, this wasn’t noticed during the run, and since it did not cause immediate part defects, it wasn’t caught until the mold made it into the toolroom with one missing male parting line lock, which I then proceeded to fish out of the press.
The primary function of straight parting line locks is protection for bypass shutoff surface, which ensures perfect alignment when the mold halves clamp together. Another function is alignment of the mold halves during injection when counteracting forces might cause them to shift laterally. When the parting line locks are missing, it naturally leads to the next problem: parting line flash.
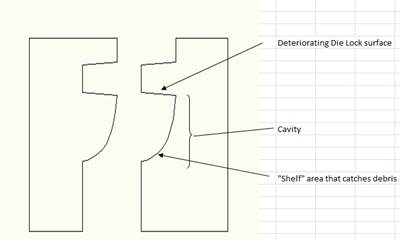
Note in the illustration that the largest portion of the part’s split line is perpendicular to the platens. In this type of configuration, injection pressure causes lateral separation, and clamp tonnage does little to mitigate the problem.
The next failure was similar to the first. In addition to the three-piece parting line locks on the mold’s operator and nonoperator sides, there are two 2-inch-diameter tapered interlocks on the opposite side of the cavity from the bathtub lock. These also succumbed to lateral forces and broke. I have witnessed many ¾-inch and 1-inch button locks fail, but I have never seen a 2-inch-diameter lock shear at the parting line.
With all alignment hardware missing or broken, parting line flash became the primary issue. Replacing all parting line locks enabled us to mold acceptable parts, but, sadly, we are now right back where we started. We reset the cycle, but nothing changed. Nothing is fixed or improved. What’s the definition of insanity again?
Lessons Learned
The details of this case serve as a good example of poor troubleshooting. So now let’s review four lessons learned:
Lesson 1: Don’t stop asking why until you are positive you found the root cause. Of all the common troubleshooting (or continuous improvement) tools available to us, the “Five Whys” truly help to identify root causes. In this case, we didn’t ask why enough. We had contamination from die lock degradation, but the fact that the die locks were degrading was just a symptom of a prior cause. Properly identifying the problem is imperative.
In failing to properly identify the problem, all other failures were inevitable. If you’re not sure what you’re fixing, you can only patch symptoms. Fulfilling customer demands and tolerating scrap only obscured the truth that we were throwing good money after bad.
Lesson 2: Don’t settle for “Band Aiding” symptoms. Once production is restored, the lid is off the pressure cooker, and if the scalding wasn’t too severe, the tendency to forget and move on to the next urgent matter is a trap all too easy to fall into.
Lesson 3: Complacency and pride are not conducive to good troubleshooting. With the urgencies, duties and details you face every day, the discipline to force yourself to not be satisfied with temporary fixes is hard to come by. Reviewing mold data in an analytical manner will help re-focus your attention on tools and issues that need to be corrected.
Lesson 4: Don’t give up. Review the problem on a new day, with a new frame of mind and with new information. Good troubleshooting skills and methods are invaluable in easing the stress that comes with the territory. The sooner problems are put to bed, the less stress they can cause and the more time you have to deal with the next challenge that comes your way.
Next month we will focus on how hindsight is 20/20 by examining this same tool from a design review perspective and uncover the lessons it provides.


