Share
Read Next
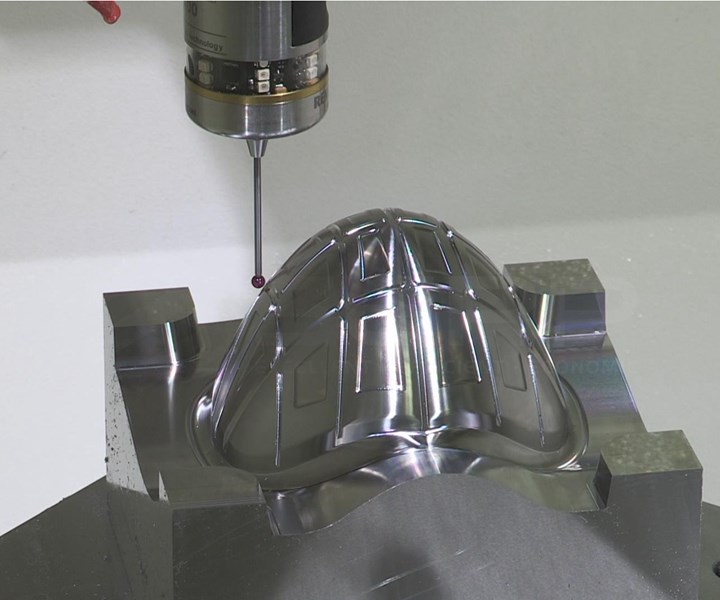
During machining of this mask frame mold cavity, a probe can automatically realign the cutting tool and update offsets in reaction to changes in temperature. Image courtesy of 3ERP.
For quality control of CNC machined workpieces, many shops use a coordinate measuring machine (CMM) that checks that the geometry and dimensions of a finished part match the original design, ensuring that the customer does not receive defective parts. A CMM identifies even the most marginal errors and allows the machinist to rework a faulty part.
However, for a shop owner, the CMM is far from a perfect solution. While this kind of inspection provides security for the customer, it does not guarantee a high level of productivity for the machinist. Why? Because identifying errors after machining means you’re already too late to recover costs. When a machinist must rework a part because the CMM returns a negative result, the value of that part diminishes by half. Twice the expected time is going into it, as well as twice the material.
An alternative solution is on-machine inspection with a machine tool probing system fitted to the CNC machine to set up parts and measure dimensions during and immediately after the machining process.
Here are a few lessons from a prototyping specialist that uses on-machine inspection for all shops:
1. Ease CMM Bottleneck
Restricting quality control to a CMM has significant drawbacks, and problems can escalate beyond simply doubling the labor time and material costs. In a busy shop, any given CNC machine will likely be assigned a new setup as soon as one set of parts are removed from the worktable. If the CMM rejects some parts later on, the machinist will have to wait for a machine to become available — or worse, interrupt another job — then set up the machine all over again. Rejected workpieces can slow down production, producing a domino effect that delays many jobs.
Also, dependence on a CMM may result in long queues, as every job in the shop requires inspection from the same machine or group of machines. Incorporating inspection into the CNC machines themselves can ease the CMM bottleneck, because the inspection burden can be spread across multiple systems or, in some cases, handled wholly by the CNC machine.
2. Improve Efficiency
Using a CMM is usually necessary for quality control, especially during precision machining, because it checks that workpieces meet geometric and dimensional specifications. But on-machine inspection does not have to replace the CMM; instead, it can work alone or in tandem with the CMM to make inspection — and the entire product cycle — more efficient.
A machine tool probing system, mounted on the machine spindle or turret, provides numerous benefits to a shop. The system can be used to identify and set up workpieces — a process that can take 10 minutes manually, but only seconds with a probe — and can measure features during the machining cycle and immediately after, when workpieces are still on the worktable.
A probing system can also carry out tasks like monitoring the surface condition of the workpiece and initiating automatic offset correction. Additionally, many probing routines do not disrupt the machining process, so inspection can be carried out without disruption.
Probes are useful because they catch significant errors early, which immediately reduces wastage and, if a CMM is being used afterwards, reduces the chances of the CMM rejecting a part. If a CMM is being used, probes also allow quality control staff to reduce their sampling rate. For example, they can inspect one in 50 parts on the CMM instead of one in 20, knowing that most possible errors would have been caught and corrected by the on-machine probe. Introducing on-machine inspection can therefore reduce total inspection time while easing the CMM bottleneck, allowing parts to be shipped faster and increasing shop productivity.
3. Increase Mold Accuracy
On-machine inspection is a particularly valuable asset in the production of molds for injection molding and other molding processes. Probes increase accuracy when machining cores and cavities, leading to better parts and a less post-processing. Moldmaking can benefit from an on-machine probe before, during and after CNC machining mold components.
Before machining, a probe can locate the workpiece, in addition to determining part orientation and rotation. During machining, it can automatically realign the cutting tool and update offsets in reaction to changes in temperature. And before the part leaves the CNC machine, the probe can perform mold-specific tasks, such as checking and verifying electrode condition. Each of these functions increases the accuracy of mold production and consequently part quality.
Use of on-machine inspection can improve the quality, repeatability and accuracy of machined molds, while helping to manage and combat variations caused by temperature change that can lead to features outside the desired tolerance.
An on-machine inspection system for CNC machines can be highly valuable for all types of shops, as it can capture errors early, provide immediate feedback and automatic offset correction, reduce inspection backlog, ease CMM bottleneck and decrease CMM sampling rate, total inspection time and scrap, while increasing productivity and machining accuracy.
Related Content
What You Need to Know About Hot Runner Systems and How to Optimize Their Performance
How to make the most out of the hot runner design, function and performance.
Read MoreThink Safety: Eliminate Hazards Throughout the Shop
The tooling community is taking advantage of new products for safer mold shops and molding facilities.
Read MoreWhat Is Scientific Maintenance? Part 1
Part one of this three-part series explains how to create a scientific maintenance plan based on a toolroom’s current data collection and usage.
Read MoreThe Ins and Outs of Hot Runner Temperature Control
A training checklist that explains the why and how of proper hot runner temperature control and system management.
Read MoreRead Next
Best Practices for Ensuring Gage Accuracy and Consistency
Mold builders who check gage readings and accuracies with gage blocks and ensure a reliable reference with granite surface plates will maintain primary standards that ultimately lead to reliable gaging and better-quality molds.
Read MoreExpertise in Mold Repair and Revisions Makes Quality Mold Inc. A Valuable, Full-Service Resource
Quality Mold Inc. does everything in house including mold repair and refurbishment. Customers also benefit by a mold warranty, financing and guidance.
Read MoreHow to Use Strategic Planning Tools, Data to Manage the Human Side of Business
Q&A with Marion Wells, MMT EAB member and founder of Human Asset Management.
Read More

