The Real Cause of Multi-Cavity Mold Imbalances
A lesson on shear induced melt variations ends some confusion regarding balancing runner systems for multi-cavity molds.
The Beaumont Effect is recognized as the source of mold filling imbalances and product variations in molds with four or more cavities. The worst failures caused by the phenomena can be most easily (visually) recognized in molds with 8 or more cavities. However, shear induced melt variations impact every injection molded part, with a greater influence than most realize. Even though the phenomenon has been understood, even taught at plastics engineering technology programs there is still a lot of confusion in regards to how it is developed and predicted with simulation software.
Understanding the Beaumont Effect
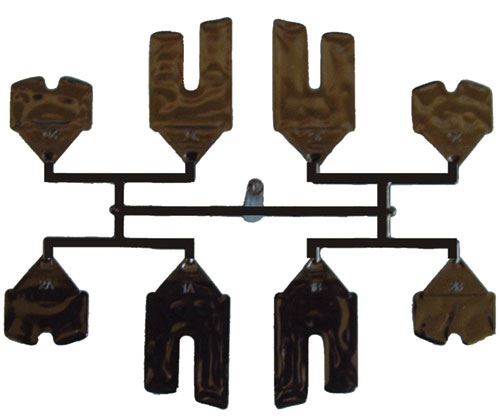
Figure 1 is a short shot showing the characteristic failure developed in an eight cavity mold using the industry standard geometrically balanced (often referred to as “naturally balanced”) runner system. Many confuse the root cause of this problem as being mold deflection, higher mold tool temperatures in the center, poor venting or high shear caused by sharp corners.
It’s an interesting debate, especially for moldmakers using simulation software to predict problems like this before committing to a mold design. Sometimes excessive mold deflection, poor venting or higher mold temperature in the center region can in fact be a problem. However even in these cases, the Beaumont Effect is generally the most significant contributor and ignoring it is unwise. Injection molding simulation software1 can predict each of these troublesome phenomenons, and even help determine an optimal solution.
To understand the development of the Beaumont Effect, we must focus on the relationship between shear, viscosity and temperature occurring within the flowing material. Plastic flowing through a runner exhibits laminar flow with maximum shear occurring near the runner walls, and near zero shear conditions existing in the middle of the runner channel. Molten polymers are also pseudoplastic non-Newtonian fluids, which means the materials’ viscosity is shear thinned. This shear thinning (where viscosity decreases with the rate of shear) causes molten material flowing near the outermost perimeter of the channel to actually have a much lower viscosity than in the center of the channel.
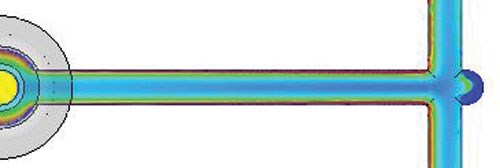
We also know that frictional heating of the melt occurs as it flows along the length of a channel. Where the shear is greatest, so is the frictional heating. The development of these shear induced melt variations actually begins in the nozzle of the molding machines and builds through the sprue and runner. The longer the channel, the more the heat builds up. Shear exposure at a corner is extremely brief and thereby does not have the ability to raise the heat in the material by any significant amount. The effect of a sharp corner has negligible effects on a material’s viscosity through either temperature or non-Newtonian shear thinning. Note in Figure 2 that the frictional heating builds near the outermost perimeter of the channel as it travels the length of the primary runner and continues around the corner. The corner itself has no influence compared to the shear heating near the contiguous wall flow length.
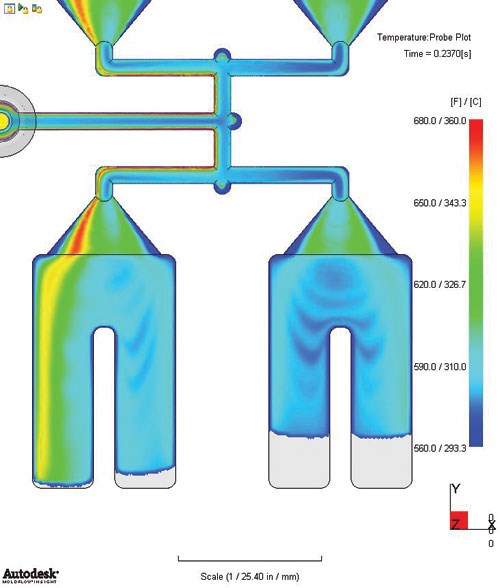
What happens at branching corners is important to understand. Figure 3 clearly shows the hotter melt developed prior to the first branch. Follow its outer high sheared laminates through the first and second branches and into the two cavities on the left. The two right hand cavities receive the material that was originally flowing through the center, near zero shear, laminates from the primary runner. This will inevitably cause density, shrinkage and warpage variation in fully packed parts. Though the negative effect of this variation is most recognized in molds with two or more branches, the phenomena can influence even single cavity molds.2 Proper use of injection molding simulation can predict the development of these melt conditions and help designers understand their distribution within a mold and their potential negative effects.
Recognizing the Problem
While modern mold simulation tools can predict the Beaumont Effect, it requires significant computational resources. Particular attention must be paid to the mesh through the runner system and gates—even the machine nozzle should be modeled, as the effect starts building there. No matter which injection molding simulation software you use, the guidelines below will improve your prediction of shear induced melt variations.
• 3-D mesh, preferably with tetrahedral elements
• 12-20 elements through thickness of runners and gates
• Include machine nozzle in model
• Optional: Higher level flow solutions (such as the inertia solver option within some injection molding simulation software1)
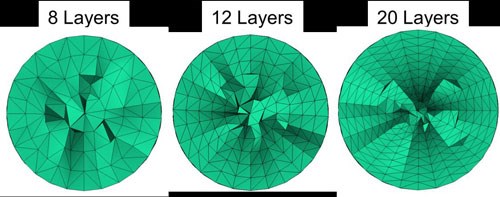
Following these guidelines will effectively turn on the ability to predict the Beaumont Effect in multi-cavity simulations. The high element count through the thickness of the runners is necessary to capture the material variation. Experience shows that between 12 and 20 elements are typically required (see Figure 4).
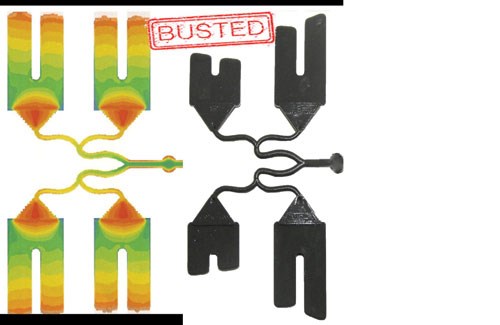
Figure 5 shows the results of a simulation using Voxel type elements. In this case, an ill-advised attempt at avoiding the Beaumont Effect was made by adding sweeping arches to the runners. Although the radiused runners appear to provide balanced material in the simulation, the physical tests disagree. The simulation in this case is misleading and can be seen to be flat out wrong. A simulation technology vendor noted that "although the structured mesh used here should be sufficiently dense, the interpolation error common to brick meshes in curved areas can actually be seen in the temperature distribution after the first branch. As the flow becomes diagonal to the elements in the voxel mesh, error is induced and both the filling and thermal variations are completely missed. A tetrahedral mesh will avoid this."
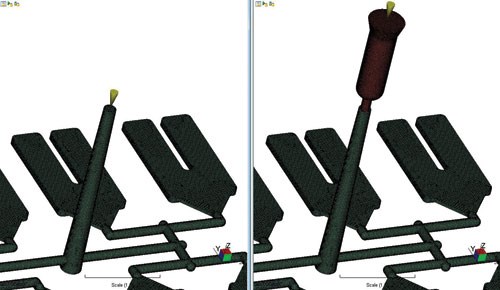
Since material shear starts building in the machine nozzle before even entering a mold, it should be included in the CAE model. Otherwise, some of the shear induced temperature variation will be missed. In some injection molding simulation software1 beam elements can replace the 3-D elements for straight sections before any branching occurs. This can help to optimize solve time, since beam elements can accurately predict the shear variation across a melt stream before it branches. However, 3-D elements will still be necessary at the first branch, and all sections following (see Figure 6).
With some injection molding simulation software for use on digital prototypes3, a higher level flow solver may be activated by turning on the programs inertia effects. Though the Beaumont Effect is not a result of inertia, the associated higher level solver will improve accuracy at the flow front. This same solver also provides the opportunity to predict the potential for jetting (see Figure 7).
Summary
Following these guidelines will help predict the Beaumont Effect, but will also cost more in terms of solution time versus using the programs default settings. In the case of multi-cavity molds, properly capturing the Beaumont Effect is absolutely essential for predicting thermal variations that continue from the gates into the part forming cavities. Once the effect can be seen, and recognized that it is unavoidable, getting creative with runner layouts can improve part uniformity.
References
1Autodesk Simulation Moldflow.
2 As presented at Autodesk University Moldflow Powertracks.
3 Autodesk Moldflow Insight.
Related Content
Tolerancing in Mold Design, Part 1: Understanding the Issues of Conventional Bilateral Tolerancing
Mold designers must understand the location, orientation and form limitations of conventional tolerancing before changing to another dimensioning system.
Read MoreHow to Manage Wall Thickness Changes in Your Mold Design
To ensure even filling and cooling, consider wall section transitions, corners and fillets, ribs and bosses, lip and rim designs and CAE flow simulation software.
Read MoreHow to Select a Mold Temperature Controller
White paper shares how cooling channel analysis, which collects maximum pressure drop, total flow rate and heat dissipation, eases the performance evaluation of mold temperature controllers.
Read MoreThree Good Reasons to Switch from Three- to Five-Axis Machining in Moldmaking
Five-axis machining technology is a great tool in the moldmaker toolbox.
Read MoreRead Next
Improving Shear-Induced Imbalance in Hot Runner Systems
Even melt distribution and balanced filling to and across all cavities while avoiding restrictive mixers is possible with hot runner manifold construction that incorporates a melt rotation design.
Read MoreHow to Use Strategic Planning Tools, Data to Manage the Human Side of Business
Q&A with Marion Wells, MMT EAB member and founder of Human Asset Management.
Read MoreReasons to Use Fiber Lasers for Mold Cleaning
Fiber lasers offer a simplicity, speed, control and portability, minimizing mold cleaning risks.
Read More
