Skills Center: Apprentice Training - Print Reading
By offering a good print-reading class with the following components as part of your apprenticeship program, you can help apprentices develop skills for visually communicating an idea or problem.
“Hand me that napkin and I’ll draw what I’m thinking.” How many great ideas or products started with a statement like that? But what came before that statement? A good print-reading class, that’s what.
Many tradespeople learned how to read prints in junior high drafting class, then progressed through years of systematic mechanical, and sometimes architectural, drawing classes to learn how to visualize shapes and objects from different views and perspectives. For many, it has become second nature. So much so that when we need to visually communicate an idea or problem, it’s easy to tell someone to “hand me that napkin.” By offering a good print-reading class with the following components as part of your apprenticeship program, you can help apprentices develop that same skill.
3D-to-2D visualization. The initial step of print reading is visualizing a three-dimensional object in two-dimensional views. An effective method of explaining this concept is asking students to imagine a 3D object inside a box and then project the 2D views of the object to the walls of the box (Figure 1). I recommend having students take simple objects that are built primarily from straight lines and sketch the 2D views of the objects as if they are inside a box.
Views. Directly tied to 3D-to-2D visualization is understanding print views. The student should use more and more complex shapes to test his or her ability to visualize, for example, top, front, right side, left side and bottom views. Next, introduce sections and cut-out views, for which a great deal of practice is necessary to quickly see the 2D views of a 3D object. A tip for helping to develop this skill is hand-sketching.
Sketching. A good print-reading class teaches the basics of mechanical hand-sketching. Many students claim they are not artists so they should not be expected to sketch. However, after many years of teaching this topic, I am convinced that one does not have to be artistically inclined to be able to sketch well. It just takes practice.
For example, require students to hand-sketch common everyday objects such as a television, computer or remote control. They must provide an isometric view and at least three 2D views (top, front and right side). The more sketching that is required as part of the class, the better.
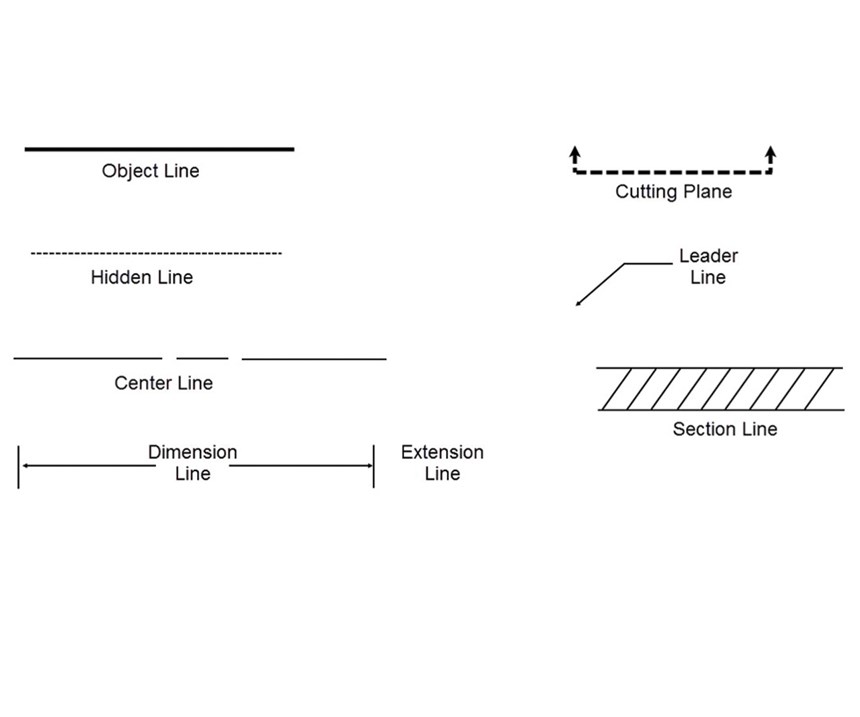
Lines. Next, introduce how to use a variety of different lines to represent physical components of the part. For example, the common lines in Figure 2:
• Object line—solid line showing the part’s visible edge or boundary.
• Hidden line—dotted line representing a detail or feature that is internal to the part.
• Center line—thin, broken line that represents the center of an object or specific details.
• Cutting plane—dotted line with perpendicular arrows that represent where a section or cutting plane exists.
• Dimension line—lines inside extension lines that have arrows on the end and show the range of a measurement
on a part.
• Leader line—line that ends with an arrow pointing to a detail or feature on the print.
• Section line—group of angled lines that represents a solid, cut-out plane.
Dimensioning. Training should cover how to use dimensioning on prints; how to denote part size in every axis and detail; how a good print can establish locations for details such as holes, pockets or slots; how to dimension for details such as angles and radii; how to make dimensions clear and not cluttered; and how to add dimensioning for only what is necessary to manufacture the part and to avoid redundant dimensions.
Tolerances. A large portion of the class should be spent on understanding tolerances. This includes the effect of positive and negative tolerances, tolerance ranges and compounding tolerances, as well as how tolerances are handled on linear dimensions, and radii and angles. It is helpful to use exercises that force the students to apply the tolerances called out on a print. For example, if the top dimension required is 3.425 inches with a tolerance of +.005/-0.000, they should figure out the largest measurement a detail can be machined and still be within specification or the smallest measurement acceptable for a detail to be within specification.
Understanding of CAD. Virtually every CAD and solid-modeling program is built on the basic principles presented here, so understanding them is critical. If an apprentice understands print reading at the most fundamental level, he or she will easily grasp the complex requirements needed to successfully work within a CAD or CAM program.
If you have been regularly reading my articles this year, then you’ve probably noticed my “get back to the fundamentals” theme. That’s because taking shortcuts in educating skilled tradespeople will not work. It is important to intentionally build apprentice programs that teach why we do things, not just what we do.
Related Content
Making Quick and Easy Kaizen Work for Your Shop
Within each person is unlimited creative potential to improve shop operations.
Read MoreHow to Foster Innovation Through a Culture of Education, Mentoring
Dynamic Tool Corp. shares its strategy for building a team with the right attitude and aptitude to deliver innovation that meets customer expectations.
Read MoreTackling a Mold Designer Shortage
Survey findings reveal a shortage of skilled mold designers and engineers in the moldmaking community, calling for intervention through educational programs and exploration of training alternatives while seeking input from those who have addressed the issue successfully.
Read MoreHands-on Workshop Teaches Mold Maintenance Process
Intensive workshop teaches the process of mold maintenance to help put an end to the firefighting culture of many toolrooms.
Read MoreRead Next
Skills Center: Apprentice Training - Work Ethic and Attitude
Once a new employee is hired, it is the company’s responsibility to teach that new hire the requirements and expectations of the position, including how to work with good work ethic and a positive attitude.
Read MoreReasons to Use Fiber Lasers for Mold Cleaning
Fiber lasers offer a simplicity, speed, control and portability, minimizing mold cleaning risks.
Read MoreHow to Use Strategic Planning Tools, Data to Manage the Human Side of Business
Q&A with Marion Wells, MMT EAB member and founder of Human Asset Management.
Read More


