In the Trenches: Shaving with Occam’s Razor, Part 2
Last month we left off in the toolroom asking ourselves “What is different” and the processors had tried every conceivable “tweak” to process out the sink. Now what?
Now where were we? Honestly I had to go back and re-read last month’s installment to refresh my memory. I forgot how intriguing this puzzle was. We left off as you may recall, where we in the toolroom had asked ourselves “What is different” and the processors had tried every conceivable “tweak” to process out the sink. The concluding sentence was: So, we had a two-piece construction with a less than round hole, possible heat dissipation issue and a verdict from processing that it was probably not sink.
At this point we erased the proverbial chalk off the board and started over. I had one of the techs set the core assembly up in a Bridgeport, swing the core body to get on center then swing the installed core at the base and at the tip. If memory serves me (which it often doesn’t) the core was reasonably on center at the base, but 5/8 of an inch up, at the tip it was noticeably not on center.
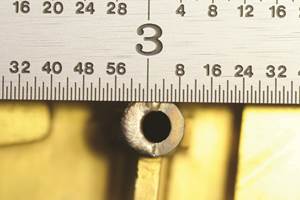
Bent or skewed? We put an ejector pin through the hole, placed the core on a surface plate and checked the pin at both ends of the 3 ½” core. It was about .011 different from end to end. So now we knew we had a hole that was not only not perfectly round, it was also not square with the world (hey, how often can you legitimately use the word square to characterize a round hole?) This discovery reinforced a previous assumption. Remember we’ve wiped the slate clean and yet the temptation to fall back on debunked theories persists. The assumption was that the retracting action of the core was pulling the plastic giving the appearance of a sink. Processing had put the lie to this idea with a 3-minute cooling time, remember?
Okay, so the hole is not round and not straight. I sent it out to have the hole wire EDM’d because we could only afford to enlarge the hole enough to make it round, and at the same time needed it to be straight. I know you’re thinking we’ve got to be close to the conclusion of this conundrum and that this was the fix. Sorry, the saga continues.
We reassembled the tool, which was (is) to say the least an awkward undertaking. (Smallish tool with two hydraulic cylinders hanging off it and a modified 3-plate design to actuate the retracting cores before the lifters eject the part.) With the repaired core we thought (if there were any lingering doubts) that pull would certainly be eliminated as a cause, and that if heat dissipation was the cause or a contributor, we would see an improvement in the part appearance because of the round pin in a round hole. “Not so much ….” You think you’re getting tired of this tale? Imagine the level of our frustration.
The unbroken, unrepaired side of the part with the one-piece construction made good parts at every run. The repaired core rendered the same defect every time. Remember Occam? “How often have I said to you that when you have eliminated the impossible, whatever remains, however improbable, must be the truth?” At this point the only difference left was one-piece construction versus two-piece construction. Could it really be that simple?
I doubt that I’ve recalled all the iterations of this repair and how many times the tool was set for a sample run. I apologize in advance if you find the conclusion anti-climactic.
We dissected the part on both sides sectioning it through the center of the boss/core hole. What we found was that the undamaged good side had an air bubble at the top of the core pin. (Imagine me closing my eyes shaking my head saying “What!?!”) The one-piece construction allowed no venting to take place and for whatever reason the gasses made their way up the core pin to the tip and the compressed gas ballooned the part against the cavity surface. The repaired defect side allowed the gasses to vent out and consequently did not create a pressure bubble at the tip of the pin. Who’d a thunk it?
We had a replacement core made (one-piece construction) and voilà, good parts! I’m still sure it doesn’t make perfect sense, but then it’s not quite a perfect world, is it?
Related Content
Laser Welding Versus Micro Welding
The latest battle in finely detailed restoration/repair of mold materials.
Read MoreWhat Is Scientific Maintenance? Part 1
Part one of this three-part series explains how to create a scientific maintenance plan based on a toolroom’s current data collection and usage.
Read MoreThe Ins and Outs of Hot Runner Temperature Control
A training checklist that explains the why and how of proper hot runner temperature control and system management.
Read MoreWhat You Should Know About Injection Mold Safety Straps
Every mold should have one in order to be safe and OSHA compliant.
Read MoreRead Next
In the Trenches: Shaving with Occam’s Razor
“How often have I said to you that when you have eliminated the impossible, whatever remains, however improbable, must be the truth?” Occam’s Razor
Read MoreIn the Trenches: Mold Repair
In this multi-part series of articles, contributer James Bourne, a tool repair supervisor and freelance writer, shares his own personal struggles in the business, as well as lessons learned and tricks of the trade garnered along the way.
Read MoreReasons to Use Fiber Lasers for Mold Cleaning
Fiber lasers offer a simplicity, speed, control and portability, minimizing mold cleaning risks.
Read More

