How to Decrease Your Internal Mold Maintenance Costs, Part 1
With an ultrasonic cleaning system, a mold shop can realize savings in cost, time and labor, as long as they are educated on the technology, the cleaning solutions and what works best for their particular situation/environment.
Walk into the majority of toolrooms today and you’ll observe individuals working hard at their craft. In most cases, you will see one or more of the skilled labor with a rag and a can of spray-cleaning solvent wiping down mold components. No big deal, it’s just the dreaded task of cleaning the tools prior to inspection, repair and re-assembly. The toolmaker monotonously removes the old grease and scrubs off the outgassing residue and rust from the mold base, cavities, cores, pins, etc. Sometimes, if that’s not enough, a little abrasive pad will take care of it. Oh, and the ejector pin holes … get out the Q-Tips, pipe cleaners, and who knows what else, and scrub the ejector pin holes clean.
Next thing you know, the skilled labor has spent the majority of the day cleaning the components and now they are bright and shiny. However, if you peer down the ejector pin holes, they’re not as pretty as the toolmaker would have liked. It’s near impossible to get down in those little holes and clean them—not to mention tedious and boring—and the toolmaker has a headache from inhaling the atomized solvent in the air (Note: there are maximum permissible exposure limits to that now airborne solvent).
One would think that in today’s day and age, there would be a better method, and there is. A method that drastically reduces the manual, monotonous labor required; cleans not only the easy-to-reach surfaces, but makes even the tiniest and deepest ejector pin holes look like polished gun barrels, and yet it creates absolutely no wear on the critical tooling surfaces and edges—even those with wear coatings.
Ultrasonics Defined
The method referenced above incorporates ultrasonic cleaning technology—the key word being incorporates. Simply buying an ultrasonic cleaning tank with the mindset that they are all the same and setting it in the corner for the toolmakers to use will get us right back to where we started—solvent, rags and abrasives.
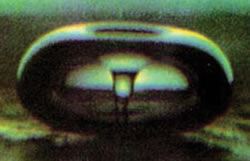
So what is an ultrasonic cleaner? An ultrasonic tank has a radiating diaphragm—usually the bottom of the tank, side of the tank or immersible assembly placed inside the tank. This diaphragm vibrates at an ultrasonic frequency—usually 20,000 to 40,000 cycles per second—which results in positive and negative pressure (or sound) waves being sent through the cleaning solution in the tank. With the words “ultrasonic cleaning,” one would think it is the sound waves that provide the cleaning action. Actually, the intense and intricate cleaning agitation is due to millions of microscopic imploding bubbles (see Figure 1) that are created due to the pressure waves resulting from the ultrasonic vibration of the radiating diaphragm (or tank wall).
This process is known as cavitation. The amazing thing is that in a properly powered tank, these agitating bubbles happen everywhere throughout the bath and are non-directional. So by placing tools in the bath, all surfaces are scrubbed no matter their relation to the ultrasonic diaphragm—provided that the cleaning solution is in contact with the part. Additionally (and this is important), the pressure waves actually travel through the steel, and can therefore provide agitation in internal cavities—such as water lines.
As stated earlier, ultrasonic cleaning molds and components requires the correct process. You can have the best ultrasonic cleaning system the world offers, but use it with the wrong detergent and the results will be disappointing at best. When it comes to mold cleaning applications, the proper cleaning solution—used at the proper temperature—is as important as the equipment itself.
A successful ultrasonic cleaning process consists of three key elements:
- Ultrasonic cleaning equipment properly sized and powered for the application.
- Detergent suitable for the contaminant to be removed, the mold material being cleaned and performs well in an ultrasonic tank.
- Correct operating temperature (180°F is often desired for mold cleaning applications).
If one of the above is out of sync, the process may not perform as desired and hand cleaning will again be the norm.
Timesavings
How much time can the correct ultrasonic cleaning process save? On average, take the time involved to PM a tool and cut it in half. Imagine disassembling a mold, loading all the cavity blocks, cores and ejector pins into the ultrasonic cleaning tank—come back in 20 minutes (after doing something productive), do a quick rinse and blow the residual moisture off with compressed air. How long would this have taken if cleaning by hand? Most likely hours, if not days … not to mention, the tools are cleaner than any human could have ever gotten them.
Complex, higher cavitation tools will save even more time. Consider the majority of time involved in a PM is cleaning—let’s say 70 percent. An ultrasonic cleaning process will not eliminate all of this time, there will be time loading the components into the basket, loading the basket in the tank, etc. But even if we were only 70 percent efficient here, the end result would be just shy of a 50-percent savings (70% of 70% = 49%).
A variety of ultrasonic tanks and systems are available in the marketplace—ranging from small tabletop models to large, completely automated multi-stage systems. Purchasing a tank or system is an important decision, and there are many factors to consider. Some of the more important things to consider are:
- Equipment Design and Quality
- Tank Size: Size and Quantity of Tooling to Be Cleaned
- Cleaning Solutions and Rust Inhibitors
- System Process Layout
- Justification/Budget
1. Equipment Design and Quality
Ultrasonic cleaning tooling is one of the most demanding applications for ultrasonic cleaning equipment. We need heavy-duty equipment that can withstand a lot of abuse. Operating temperatures are high (ideally180°F), loads are heavy (which absorb ultrasonic energy), cleaning solutions are typically alkaline in chemistry for best cleaning performance, and ultrasonic cycle times are longer than in typical ultrasonic cleaning applications (typically 10 to 30 minutes as opposed to 1 to 5 minutes for the typical parts cleaning application).
Ultrasonic Transducers
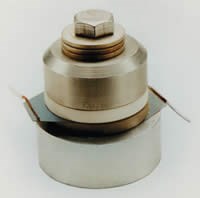
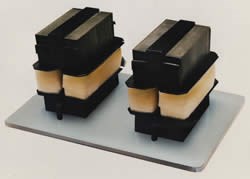
For these reasons, it is important to understand that there are two different types of ultrasonic transducers used in ultrasonic cleaning tanks: magnetostrictive (see Figure 2) and piezoelectric (see Figure 3). The transducers are the heart of the ultrasonic cleaner and the basis for the tank design. Both types of transducers do the same thing—vibrate a wall in the tank at an ultrasonic frequency—but they are completely different in design and durability.
Most manufacturers use piezoelectric transducers in their systems. They are inexpensive to manufacture, cheap to buy, lightweight and can be attached to the tank (or face of an immersible transducer) by simply bonding them on with epoxy. Because they are lightweight, they are attached to a thin tank diaphragm.
Piezoelectric systems have the following problems over the long term when it comes to heavy-duty applications, such as tool cleaning:
- Susceptibility to cavitation erosion—pitting through the tank wall where the transducers are attached (can happen in as little as six months to two years in an aggressive application and is not warranted by the manufacturer).
- Deterioration of the output of the piezoelectric transducer, which reduces cleaning performance over time.
- Detachment from the tank due to epoxy bond failure.
- Inability to operate at higher temperatures (typical recommended maximum temperature for a piezoelectric cleaning system is 160°F)—the higher the operating temperature, the faster the deterioration of the piezoelectric transducer.
The other type of transducers are magnetostrictive transducers, which are manufactured of a pure nickel alloy and utilize an inherent property in the material (magnetostriction) to create the vibration in the tank wall. While this technology is more expensive to manufacture, it offers the following benefits when operating in a heavy-duty environment:
- Consistent performance over time, as the magnetostrictive property in the nickel never deteriorates; it is part of the chemical structure of the material.
- Ability to operate at high temperatures (180°F-200°F) for extended periods with no degradation of the material or cleaning performance.
In addition, there are several methods of assembling and attaching magnetostrictive transducers. One is using flat nickel laminations formed into a stack (resembling a small transformer), which is known as zero-spaced. The other method uses corrugated laminations so that when formed into a stack, it resembles a honeycomb from the end view. The zero-spaced method uses more nickel (added cost), but allows for several additional benefits:
- The zero-spaced stack is silver brazed directly to the radiating face, creating a solid all-metal joint that provides improved energy transmission.
- The zero-spaced stack has much more mass, which drives a more powerful pressure wave into the tank bath; therefore providing better cleaning power and less load sensitivity.
- Because there is more mass, the radiating diaphragm that the transducers are brazed to is much thicker, eliminating the routine problem of cavitation erosion.
Summary
Implementing the correct ultrasonic cleaning process can provide a significant cost benefit by reducing labor and consumable cost, improve molding performance with cleaner tools, and improve morale by reducing employee exposure to hazardous airborne solvents and the monotony of manual hand cleaning. Next month we will look at the ultrasonic cleaning process in detail and discuss cleaning detergents, process layout and return on investment.
Related Content
Precision Meets Innovation at IMTS 2024
After attending IMTS, it's clear that the integration of advanced technologies is ready to enhance precision, efficiency and automation in mold manufacturing processes. It’s a massive event, so here’s a glimpse of what the MMT team experienced firsthand.
Read MoreQuestions and Considerations Before Sending Your Mold Out for Service
Communication is essential for proper polishing, hot runner manifold cleaning, mold repair, laser engraving and laser welding services.
Read MoreHow to Overcome Complex Mold Texturing Problems
Key benefits when considering laser technology for mold texturing and repair.
Read MoreWhat You Need to Know About Hot Runner Systems and How to Optimize Their Performance
How to make the most out of the hot runner design, function and performance.
Read MoreRead Next
Cleaning Molds: Part I
Cleaning a mold is a critical part of the repair process, but many myths must be dispelled.
Read MoreAre You a Moldmaker Considering 3D Printing? Consider the 3D Printing Workshop at NPE2024
Presentations will cover 3D printing for mold tooling, material innovation, product development, bridge production and full-scale, high-volume additive manufacturing.
Read MoreHow to Use Continuing Education to Remain Competitive in Moldmaking
Continued training helps moldmakers make tooling decisions and properly use the latest cutting tool to efficiently machine high-quality molds.
Read More
