CMM Integral to Growth Strategy, Overall Capabilities
The appropriate strategy in precision measurement equipment additions helped YAMI satisfy customer quality and productivity levels. And the addition of future in-house mold building/repair/engineering capabilities will help serve their customer base even better.
Yahagi America Molding, Inc. (YAMI, Park City, KY) recently sought out new metrology technology to capture a greater share of business from its largest customer. As a result of the investment, the company expects to nearly triple its revenues in the next few years because of an increased ability to process a wider range of parts—especially with tighter tolerance work with stringent quality control demands.
“We were at a pivotal moment in company history,” says Greg Parker, Quality Supervisor with YAMI. “Our largest customer wanted to expand the amount of business we handled for them. However, growth would require technology upgrades and a mindset with some pretty big changes. Our strategic partnership with Mitutoyo helped us to increase our business and develop a stronger relationship with our largest customer.”
YAMI, a Tier 2 automotive supplier making injection molded parts found throughout Japanese automobiles, turned to Mitutoyo America Corporation (Aurora, IL) for increased metrology capabilities found in a state-of-the-art CMM, as well as their newer contour and surface roughness testing equipment. Specifically with the new CMM from Mitutoyo, YAMI addressed several points that were important in achieving this growth goal:
• Tighter part tolerances and the ability to measure and document quality control requirements
• Lower production costs
• Molding of abrasive materials and how to handle its detrimental effect on mold wear
• Mold maintenance/repair services that can keep up with demanding production schedules
Original Business Focus in “Non-Critical” Tolerance Molding
YAMI was conceived in 2003 to serve the injection molding part production business for Denso
Corporation’s North American facilities. YAMI currently produces approximately 4 million parts monthly—double the volume from just a few years ago—for various applications. The majority of the parts is found in less critical tolerance HVAC component parts. Its 27 all electric injection molding machines range in size from 18 to 280 ton units. They are fully automated with take out and gate cutting automation. A total of 150+ different production parts are produced by YAMI. Annual sales are currently at $8 million and the company hopes for an aggressive $20 million annual revenue goal within the next few years.
From Outside Vendors to Inside Mold Building/Repair Capabilities
With the new material additions came issues on how mold engineering and repair work would be coordinated. Harder tool steels and tool coating technologies are often required. Most molds deliver a million shot life performance. Their heavy wear glass-filled part molds deliver between a 600,000 to 800,000 shot life performance.
Long-term needs are continually debated. “We’d love to own our own destiny on production scheduling by adding more internal mold repair/rework capabilities,” says Parker. “We envision our facility taking over the responsibilities of ground floor engineering/design, machining and tryout stages from customers within the next several years.”
The company is currently served by a Japanese mold building sister company (IMEC Company, Ltd.). Up-front engineering/build through tryout services are coordinated directly between the customer and IMEC. They work with Midwestern mold repair shops for any repair/rebuild needs.
Overall part inventories often need to be maintained at a two- to three-week inventory because of the repair downtime required with outside vendors’ timelines. Bringing the mold repair work inside will help eliminate larger inventory levels.
Parker says that focusing on better communication between customer and end supplier would lead to their eventually bringing much of this mold design/build work to the U.S. He believes this would have a positive effect on the number of tryouts that typically take place today (eight to 10 attempts, on average) versus how a localized response and direct on-site communication could possibly lead to faster mold approval.
Future Growth in Tighter Tolerance Work
“It was quite a challenge to grow toward higher precision molding work,” states Greg Parker, Quality Supervisor for YAMI. “We’ve lived in the world of automotive HVAC parts in which typical tolerances ranged from +/-.1mm to .25mm. Then Denso started reducing their supplier base of 40-50 companies—and we made the core supplier cut.”
While the company could handle the production molding capabilities, they didn’t have a way to check part specifications to tighter levels and speed of measurement. Before, their only option was to use local services to check higher tolerance parts. And at times, they used other limiting hand-held devices and even a Flexbar Microscope. With larger volume work, they knew they had to bring that work in house (typically outsourced) for both precision and productivity.
Two key job additions include an accelerator pedal and base assembly, as well as a Buss
Acceleration Sensor (aka: BAS) used in airbag assemblies. These parts required a much tighter tolerance range of +/-.02 to .05mm for those parts. The BAS part is ultrasonically welded with a metal insert, resulting in a need for scanning 50 different points across the weld surface to make sure it meets flatness requirements.
Parker explains that their CMM search needed to measure quickly, accurately and cost-effectively—with an obvious and quick ROI payoff.
New CMM Technology Improves Production Capabilities
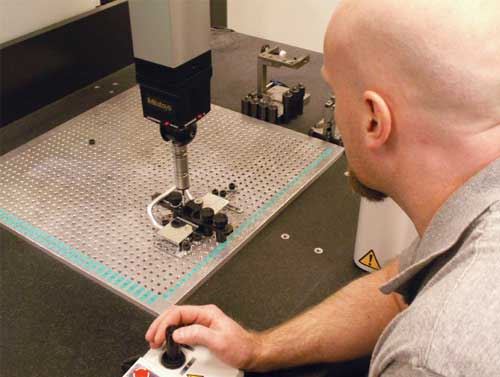
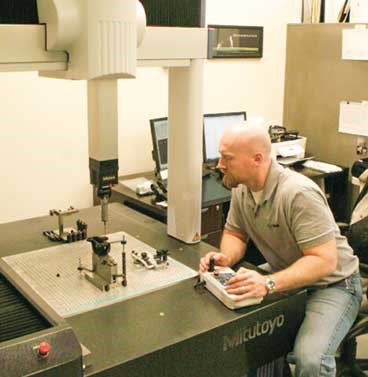
Their solution: a Mitutoyo Crysta-Apex CMM. They knew that CMM technology would not only be able to measure the tighter tolerance levels, but also handle a higher volume of part checking.
And while most of their parts could fit in the palm of your hand, they invested in a CMM that offers a much larger envelope. They expected that future jobs might include larger part sizes, as well as the ability to check the mold halves themselves for design/tryout/re-engineering/repair work they might coordinate internally in the future.
The ability for the Crysta-Apex CMM to handle this type of tight and unique angled measurement is not an issue due to a wide range of probe styles/sizes used, as well as an indexable head probe system that can be easily and quickly configured in hundreds of different positions.
They operate the Crysta-Apex CMM in multiple modes. The joystick-driven mode is used for one-off types of checks and programming. It can also be operated in an unattended mode when it becomes a daily part checking requirement (build the fixture, write the program, CNC automatically runs).
Important Features
Measuring range of 27.75” (705mm) X-axis; 27.75” (705mm) Y-axis; 23.81” (605mm) Z-axis
• Measurement resolution to 0.000004” (0.0001mm)
• Scanning and touch-trigger probing capabilities
o Renishaw Indexable Head Probe System (PH10MQ): 720 indexable positions that take less than 4 seconds to complete
o Continuous Scanning Probe
• Comprehensive MCOSMOS C3 Software System
• Full factory support, training, installation and warranty
A Self-Proclaimed “Mitutoyo Shop”
YAMI’s technology brand loyalty at YAMI is found beyond CMM applications. Other Mitutoyo technologies are utilized for their customer’s specialized metrology needs. One additional example is found with the BAS part that required specific quality control checks not capable with existing equipment. For example, a 2mm central radius is checked via a Mitutoyo Contracer CV 3100 profile contour measuring machine. This tight +0/-.2 mm tolerance check could not be measured by a radius gauge or other type of measuring device because of the intricate design of the part, according to Parker. On that same BAS part, an important metal insert is checked to a 12 RZ roughness level with Mitutoyo’s Surftest SJ-400 portable surface roughness tester. Critical to that part is the metal insert’s roughness level because the part is ultrasonically welded in downstream operations and the overall surface must meet a precise surface roughness to provide a tight fit with its mating part.
Parker appreciates the user-friendliness that both machines provide, especially in the touch screen capabilities of the color-graphic LCD and the high-speed printer that prints out measurement results right at the work space. Both machines provide a fairly small footprint that works well in their gauge room’s limited space.
Lesson Learned?
The addition of production equipment (e.g., molding machines and automation) isn’t the only solution when trying to grow your molding company’s overall business volume and processing capabilities. In YAMI’s case, the appropriate strategy in precision measurement equipment additions helped them satisfy customer quality and productivity levels. And the addition of future in-house mold building/repair/engineering capabilities will help serve their customer base even better.
For More Information
Yahagi America Molding, Inc./ (270) 749-3000 / yahagi.webs.com
Related Content
2024 Moldmaking Insights: A Year in Review Part 1
A look back at the top moldmaking trends of 2024, as revealed through MMT's analytics. This review highlights the most popular technical articles, case studies, tips and best practices that captured the industry's attention over the past year.
Read More7 Measurement Innovations Transforming Moldmaking
Smart sensors and sophisticated process and measurement data management are driving intelligent moldmaking to new heights.
Read MoreIndiana Mold Builder Decatur Mold Offers a History of Grit and a Future of Innovation
Decatur Mold Tool and Engineering Inc. serves as a tooling tour guide, helping busy tooling managers reduce uncertainty, lighten workload.
Read MoreVIDEO: Maintaining a Customer-Centric Culture
Progressive Components President Glenn Starkey talks about the importance of the customer and culture when developing technology solutions for the moldmaking industry.
Read MoreRead Next
Applying Continual Process Improvement with the Right CMM/EDM Setup
Shifting coordinate-acquisition from EDM to CMM yields dramatic productivity gains.
Read MoreReasons to Use Fiber Lasers for Mold Cleaning
Fiber lasers offer a simplicity, speed, control and portability, minimizing mold cleaning risks.
Read MoreHow to Use Continuing Education to Remain Competitive in Moldmaking
Continued training helps moldmakers make tooling decisions and properly use the latest cutting tool to efficiently machine high-quality molds.
Read More


