Five-Step Process Accelerates Part-to-Production Leadtimes
With mold commissioning analysis technology and melt rotation technologies, multicavity molds can now be commissioned faster to meet the critical time-to-market timeline, while achieving cost savings and continuous improvement in all aspects of product, process and productivity.
Fierce competition within the plastics industry is driving productivity and the need to do more with less. These same forces demand a very fast part-to-production leadtime to win OEM molding programs, and, going beyond these challenges, require mold builders and processors to qualify and test molds within very tight time parameters. In this competitive environment that demands both speed and accuracy, the mold builder and manufacturer need to go to production as quickly as possible with tools to ensure solid quality control from their molds long before the presses start producing parts by the millions.
Additionally, leadtimes for new mold builds have decreased drastically over the past few years. Although molds frequently are manufactured within the quoted leadtime, it is in the mold sampling process that costs can spiral upward and time is lost; both factors negatively impact time-to-market and manufacturing efficiencies. During initial mold commissioning, there is a great deal of additional lost time and money when sampling and debugging the mold and the molding process to produce an acceptable product.
Thus, the end result is typically a part-to-production leadtime increase of weeks or even months. Many of the delays can be attributed to cavity-to-cavity variations hidden inside of the mold that tie up numerous human capital resources like toolmakers, processors and engineers to diagnose and make corrections. Too often, the proposed solutions do not solve the root cause of these variations, and a band-aid solution is hastily applied under the pressure of ever-shrinking leadtimes. Such a move creates long-term issues throughout the production life of the mold that must be dealt with on a daily basis.
In 1999, we participated in a two-part article in Moldmaking Technology magazine that discussed the primary causes of filling imbalances-and offered the means to identify, diagnose and solve these challenges with a new technology that analyzed molds to pinpoint the source of filling imbalances ("Exposing the Gremlin I," March, page 27; "Exposing the Gremlin II," September, page 21). The solution was a patented melt rotation technology that could quickly and accurately debug the shear-induced imbalances in a mold, getting it into production at record speeds. Today, this technology is in use in thousands of molds worldwide, not only improving production startup and improving part quality (and thus providing a quick ROI), but also enabling many companies to be more competitive in today's global market.
Since then, other solutions also have been developed. At NPE 2003, newer, better and faster ways to get from the proverbial art-to-part were introduced, and a new five-step process offered processors new, quicker and more accurate options. Optimally used in combination with proven melt-management advances, the new technologies helped processors correctly diagnose and quantify variations and accelerate part-to-production leadtimes. As an added benefit, the new process ensured a more stable running mold throughout its production life.
The Five-Step Process Explained
Step 1: Mold Samples
Getting a representative sample from the mold is very important. Each cavity and flow is identified for the particular layout and number of cavities according to their respective flow group. The test is done as follows: Once a reasonable process for the mold has been established, the processor can set the hold pressure and hold time to the minimum value that the process controller permits (zero where possible). The screw feed can be reduced, if necessary, until the best-filling cavity in the mold is about 80 percent full to avoid masking any imbalances due to unvented air, thin regions in the part geometry or other hesitation effects. The original injection rate should remain constant.
Step 2: Weigh Parts
Collect all the short shots from a single shot and weigh them by their individual cavity location, within the respective flow groups.
Step 3: Determine Steel Imbalance in Flow 1
Identify short shots molded from Flow 1 (typically two parts in a four cavity mold, four parts in molds with eight or more cavities) and then contrast the weight of these short shots to each other using a graph. These differences are typically variations resulting from dimensional discrepancies in the mold steel.
Step 4: Determine Steel Imbalance in Other Flows
Distinguish each of the other flows in the mold. This step also requires that processors repeat Step 3, isolating the effect of the dimensional variations in the mold steel on each of the other flow groups.
Step 5: Determine Shear-Induced Imbalance
To determine shear-induced imbalances, the optimization process requires that the processor identify short shots molded from Flow 1 to determine their average weight. Contrasting this to the average weight of the other flow groups, gives the molder the shear-induced variation created within the runner. The shear-induced variation is independent of dimensional differences in the mold steel and cannot be corrected by machining the cavities, runner or gates in the mold.
The Fall of Injection Molding Machines
For many injection molders, the injection molding machine's control options are regarded as the key factor to produce identical parts from a multicavity mold. It comes as no surprise that machine manufacturers have, over the years, significantly advanced the controls and options available to the plastics processors in efforts to improve part-to-part quality and consistency. As manufacturers have learned, however, advances in controls and process variables haven't necessarily resulted in better quality parts.
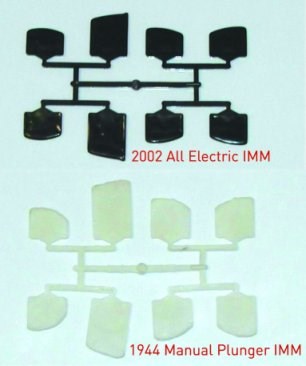
For example, at NPE 2003 it was demonstrated that part-to-part quality within a given shot, contrary to conventional wisdom, is one manufacturing function in which the molding machine plays a minor role. The melt rotation technology was used on a 1944 Van Dorn manual plunger injection molding machine and a top-of-the-line 2002 all-electric molding machine. The same mold was run in each machine to provide a true comparison between the machines. Half of the runner system of the mold was retrofitted with this advanced technology, while the other half simply used a traditional geometrically balanced runner system. As shown in Figure 1, the filling patterns were identical from both machines. The half with a geometrically balanced runner shows the common filling imbalance problem, while the half with melt rotation technology shows a balanced filling between all the cavities for both machines. Given fifty-eight years of technological advancements in the molding machines tested, there has been nothing within the machines to deal with and correct the cavity-to-cavity variations seen within a given shot-until the development of the now-proven melt rotation technology. It's a given that the 2002 all-electric IMM provided a better shot-to-shot consistency, which only means that any scrap being molded will be consistent from shot to shot without variation.
The Advent of New Technologies
After a new mold has been manufactured and inspected from cavity to cavity to tolerances within fractions of a millimeter, it is sent to the shop floor. This is where the true test of the mold's quality can be realized. Often, this is where the mold-commissioning clock goes into double-time, and days are lost due to sampling issues. This could result in lost profits and lost market opportunities for the product and the processor. This stage in the product life cycle is an expensive and time-consuming necessity, and yet, the industry is hard pressed to find instances when a mold starts up flawlessly and acceptable parts come out of all cavities on the first trial run.
Mold commissioning time can further be complicated when the mold is multicavity; usually the required time will increase with cavitation. Single-cavity molds are typically the easiest to commission, but as product volume increases it becomes unrealistic to build single-cavity molds due to part cost, production demands and required equipment for multiple molds. These cost factors drove the plastics industry and moldmakers began building multicavity tools. A sixty-fourDcavity mold typically will produce a lower cost part than a single-cavity mold, but the mold commissioning time can often increase from days to weeks or even months.
To help with the mold commissioning process, the five-step process was developed and is now offered as an automated software package. This software is built on the same principles explained in the September, 1999 article. By using the software, the confusing task of flow numbering, performing proper calculations, and graphing all the data is done automatically for the user and printed in a one-page report.
This new technology differs from conventional methods in calculating imbalances. The conventional method simply determines the percent difference from the heaviest cavity versus the lightest cavity in a given shot. This will certainly give the process/technician a percentage value, but it does nothing to help them diagnose the root cause of the variation they are seeing.
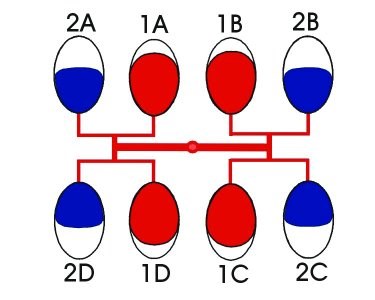
By separating out individual flow groups within a mold (typically one cavity per flow group per quadrant-see Figure 2), steel imbalances can be separated easily from shear-induced imbalances within a mold. Users will gain additional valuable information as to the cause and required corrective action to the imbalances they are seeing.
The demand for better precision parts at a lower cost continues to grow, challenging injection-molding technology to advance, and ultimately allowing companies to stay competitive in the global marketplace. A molder must be willing to adopt new technologies in the early stages of the product life cycle and not as a final effort to fix a problem, or the full benefit of the technologies will not be realized. A molder must be able to produce parts in multicavity tools consistently and meet the part-to-production leadtimes by minimizing the mold commissioning stage.
As such, this five-step process gives the molder and toolmaker a better view into the mold by separating out steel imbalances from shear-induced imbalances so that resources can be spent where they will be most effective. With the development of the analysis technology combined with melt rotation technologies, multicavity molds can now be commissioned faster to meet the critical time-to-market timeline, while achieving cost savings and continuous improvement in all aspects of product, process and productivity. These are major competitive tools.
And, last but far from least, the new technologies will enable moldmakers to process invoices and get paid more quickly since the mold debugging operation can be accomplished more readily.
| Case Study |
| Elcom, Inc. (El Paso, TX), a southwest molder, was quick to adopt the five-step process for qualifying its molds after seeing how it easily complemented its melt rotation technology to address shear-induced imbalances within its molds. The customer remitted data from an existing sixteen-cavity mold where variations were causing nonfills and flash within the parts. When comparing the short shot data using the traditional method for calculating a balance of fill analysis, a 50.8 percent imbalance was shown.
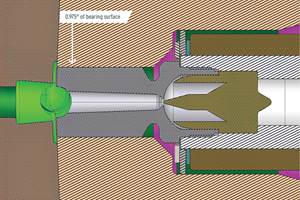
However, when analyzing the same data using the five-step process, patterns developed that allow the user to view steel imbalances for each flow group and the corresponding shear imbalances between the various flow groups. The maximum shear imbalance was calculated to be 31.6 percent maximum, and the steel variations ranged from 19 to 37 percent within the flow groups. While melt rotation technology needed to be implemented to solve the shear-induced imbalances, that approach alone was unable to address the steel imbalances in the mold. These imbalances had to be corrected by the tool shop through examination of the differences within the cavities. After studying the data, one could see that the cavities in the A & D quadrants were heavier in all fourflow groups. With this information, and by analyzing the diagram of the runner layout provided by the five-step process, it was noted that cavities A & D for all flow groups were on the left side of the sprue. There were two main causes for a pattern such as this: 1. A cold slug is not being trapped at the base of the sprue, thus causing a flow preference toward one side of the mold. 2. A steel dimensional variation exists within the mold. After examining the cold slug well at the base of the sprue, it was determined that the well was sufficient to trap any cold slug that may be in front of the flow. Therefore it could be determined that a steel variation in this area of the mold had to be the cause of the large steel variation. Then, the focus was in analyzing the root cause of the steel imbalances by verifying cavity spacing, runner diameters, runner lengths and gate locations. The variation ultimately was found to be within the diameter of the primary runners. A variation of 0.006" (0.152) was seen from the right side of the sprue to the left side of the sprue. The larger primary runner was on the left side of the sprue, which correlated with the data presented by the five-step process. The larger diameter created less of a pressure drop and an easier flow path for the plastic as shown by the equation where 'r' is the radius of the runner. By looking at the results of the traditional imbalance method, it would have been impossible to determine the source of the steel variation as easily by using the this new technology. In order to properly address the shear imbalances within the mold, a processor/molder would need to use the proven melt flow technology to provide the overall runner system and mold filling balance. |
Related Content
Hot Runner Truths, Myths and Overlooked Areas
Addressing hot runner benefits, improvements and everyday issues from the perspective of decades of experience with probably every brand on the market.
Read MoreHands-on Workshop Teaches Mold Maintenance Process
Intensive workshop teaches the process of mold maintenance to help put an end to the firefighting culture of many toolrooms.
Read MoreHow to Overcome Five Common Hot Runner Cable Connection Problems
Here are some simple solutions for pushed-back or bent pins, pushed-back inserts, high amp deterioration, loose or broken latches and missing or loose ground wire connections.
Read MoreHow to Solve Hot Runner Challenges When Molding with Bioresins
A review of the considerations and adaptations required to design hot runners and implement highly productive injection molding operations.
Read MoreRead Next
Multi-Cavity Mold Issues Solved with Melt Rotation Process
Toolroom supervisor shares his experience with a rheological control solution to some obvious and some not-so-obvious challenges with product and color variations in a multi-cavity mold.
Read MoreAre You a Moldmaker Considering 3D Printing? Consider the 3D Printing Workshop at NPE2024
Presentations will cover 3D printing for mold tooling, material innovation, product development, bridge production and full-scale, high-volume additive manufacturing.
Read MoreHow to Use Continuing Education to Remain Competitive in Moldmaking
Continued training helps moldmakers make tooling decisions and properly use the latest cutting tool to efficiently machine high-quality molds.
Read More
