Determination and Skill Save Critical Micro-Mold Cavity
Team 1 Plastics Inc. found a new supplier “soul mate” in Alliance Specialties and Laser Sales (Wauconda, Illinois), which displayed a commitment to, and the skills for, a successful micro-mold cavity repair solution.
Team 1 Plastics Inc. (Albion, Michigan) operates 24/7 molding plastic parts for the automotive industry in presses ranging from 25 tons to 300 tons. As the name Team 1 implies, the company’s success is built on teamwork and a culture that revolves around continuous improvement, excellent customer service, flexibility and reliability. When a serious problem arose concerning a complex production mold that has been in service since 2011, Team 1 Plastics Inc. (Team 1) found a new supplier “soul mate” in Alliance Specialties and Laser Sales (Wauconda, Illinois), which displayed a commitment to and the skills for a successful solution.
Parts that Team 1 molds typically fall into three categories that include precision components, transparent plastics, enclosures and housings. The company specializes in molding small, intricate, precision components and also offers light assembly services. The complex production mold for which Alliance Specialties and Laser Sales (Alliance) found a solution produces small precision components.
Tiny Damage Poses Big Problem
This precision mold is a two-cavity family mold, which means it produces two separate and distinct parts. While one cavity makes parts, Team 1 employs a hot-runner shut-off to the other cavity so that only one cavity is in production at a time. The company maintains inventories of each part to ship quantities as needed to its customer. Dave Seedorf, who is Team 1’s engineering manager, says that not too long ago, the second cavity was in production for months before it became necessary to switch to the other cavity to replenish the inventory of the other part. Team 1 was switching between cavities when it discovered the damage. “When we started production, we realized something didn't look right,” Seedorf says. “The tool was producing a part that was in such bad shape that it was not even possible to trim excess material off the part to meet orders. We knew that whatever inventory we had on-hand was it, and that raised the situation to a whole new level of priority.”
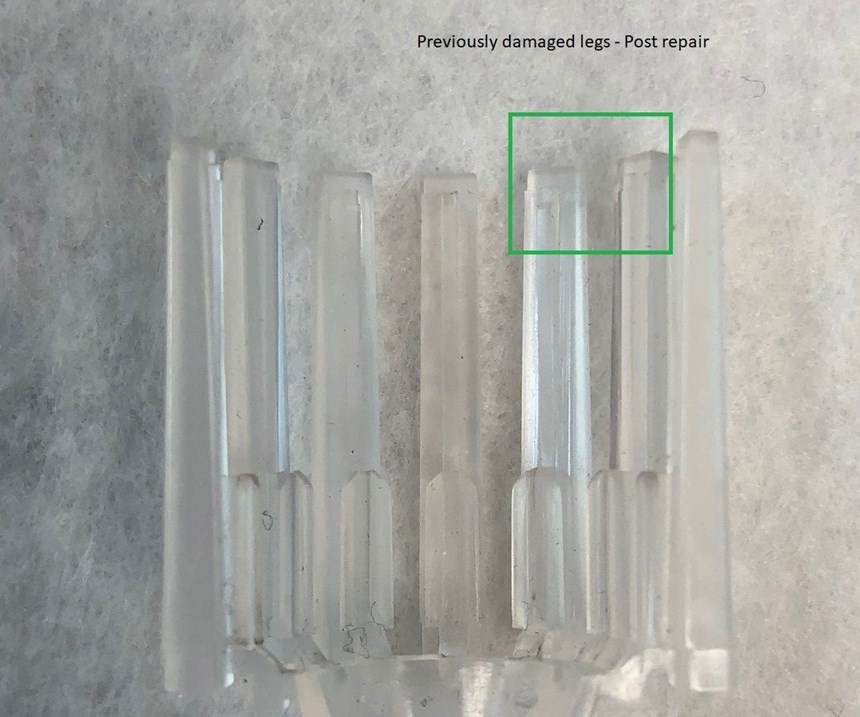
The part that the mold produces is a lens, or a light pipe, and it fits into a heater control unit in an automobile dashboard, he says. The part itself measures 27.24 millimeters wide by 26.71 millimeters high and has seven “legs,” each with an undercut that helps secure it in place when assembled. An LED bulb goes up into the middle of it and then lights the small features at the tips where they are visible. “The way the tool is constructed, you have a block and the visual tips of the part are embedded into the block itself about 2.5 inches down. The width of each tip of the part is about 1.6 millimeters, and the distance between the ejector blade and the textured tip is about 0.5 millimeter. Each leg is spaced about three millimeters apart from its neighbor. It was near the parting line of these tips of the features to the body of the part where the breakage took place, in between the ejector blade and the visible textured tip of the insert.” The trouble, Seedorf says, was that no one—not even the mold manufacturer who originally built the tool—wanted to attempt to repair the cavity that molds the tiny part, and that posed a big problem. Every mold shop he turned to told him it was not feasible to reach down into the cavity to be able to weld it and, even if it could be welded, it was not possible to go back and try to properly blend the weld and recreate the textured finish. They said that a better solution would be to build a new cavity block.
Seedorf admits that he was getting a little panic-stricken, but then he recalled meeting brothers Tony and Chris Demakis of Alliance Specialties and Laser Sales when he attended Amerimold 2017 in Chicago. “I remember Tony and Chris showed me some of their areas of specialty including laser welding, mold repair and mold polishing. What is unique is that they do this all in one location, but at the time, nothing told me that I should do business with them because, for one, we have an in-house tool room,” he says. “We also have several tooling vendors here in southwest Michigan, so I thought, ‘Why would I send work to Chicago?’” He would find out soon enough.
Repair or Rebuild?
Faced with the very real possibility of having to hire someone to build a new cavity block and remembering his conversations with the Demakis brothers, Seedorf says he decided he would contact Chris at Alliance as a last resort. He figured that he would see if Chris could offer a workable solution. After describing the problem over the phone, Seedorf emailed Chris a model of the part and a couple of photographs. “When I looked at it, I knew that I was only looking at the model, but I called Dave and said it doesn't look like it is in a bad spot. I told him that I thought we could fix it,” Chris Demakis says. Seedorf explained that he went to the original toolmaker, who said that the part is scrap and that a new cavity block and ejector blades were required. Demakis replied, “If that is the case, send it to me and I’ll take a closer look at it.”
“I sent Chris a lot of information and sample parts, good and bad,” Seedorf says. “To be honest, I fully expected that Alliance would reply in the same way as the others—that repairing the cavity was not feasible—and that is kind of what happened.”
“The parts came in along with the custom ejector blades and cavity block,” Demakis says. “It can be tricky quoting work just looking at a model because you don’t get the full perspective of how big a part is or, in this case, how small it is. I showed my dad (Owner John Demakis) and others at Alliance, who told me that there was no way to get in there and fix it. I explained that I could not call Team 1 and tell them I couldn't fix it unless I had exhausted every option that I had.”
“We knew that whatever inventory we had on hand was it, and that raised the situation to a whole new level of priority.”
Despite continued objections, Chris Demakis and his brother Tony offered Seedorf a deal. They told him that if they fixed it and it worked that he should pay them. On the other hand, they told him that if they tried to fix it and it was catastrophic that they would not charge him. Demakis says, “It was a risky thing to do, so I was determined to find a way to do it.”
“Chris reassured me that there were no guarantees, and we understood that,” Seedorf says. “But I think at that point we were kind of stuck in desperation mode and willing to try something.” Seedorf says that the company’s alternative was to spend thousands of dollars on a new block. Getting a new block would take eight to ten weeks, not including necessary time for sampling, layout, dimensional tuning and PPAP time. “With no inventory, what were we going to do for the next eight weeks to help our customers meet their orders?” Seedorf says. “Chris confirmed that laser welding can get down in there, but what process can clean that out?” Team 1 did not have the original electrodes. “The alignment of that part had to be really dead-on, otherwise it could cause mismatch issues and other problems.”
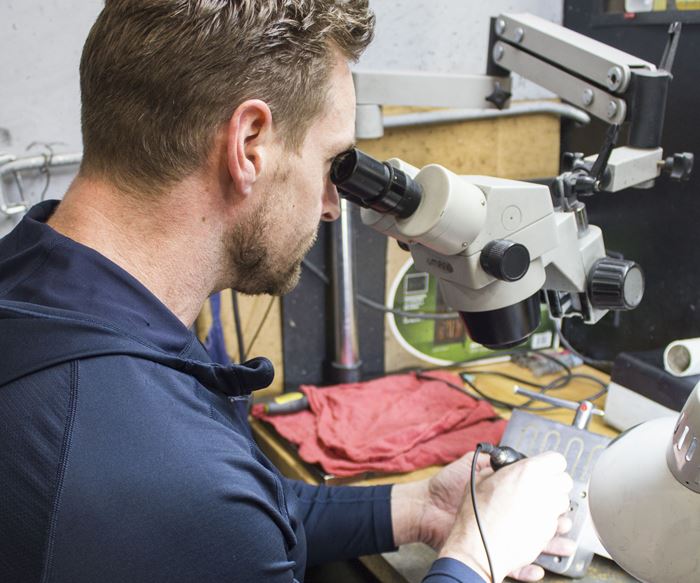
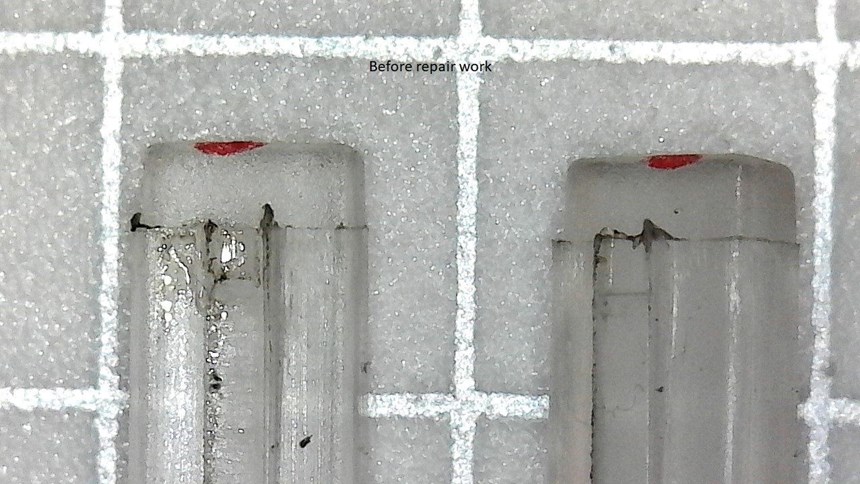
Looking more closely at the tooling, Chris Demakis noted that there was a small issue with one of the ejector blades. “The blade was worn out slightly, and there was an undercut, so it was creating a lot of flash in the detail at the bottom of the rib. I zoomed in with a 10x microscope and marked the spot. In the cavity, only two of the seven identical legs were bad.” However, he says that on the mold, the damage was located about 0.125-inch inside the parting line, not on the actual edge as he expected, and that there was mold material missing with high spots on the outside, which further complicated the repair. “That is why the lifter couldn't form the detail correctly,” he says.
Alliance’s laser welding foreman Rick Hendry applied his expertise and went to work using the company’s Vision Unixx 300W Fiber Laser Welding System to rebuild the missing metal deep inside the cavity. “Because the process of laser welding is so precise with minimal heat displacement, it was the only possible way to get down into those difficult areas to make the repair without risking damage to other areas of the cavity,” Hendry says. He adds that typical welding processes require users to heat the surrounding area to accept the weld, whereas laser welding sends very quick pulses of focused heat to very specific areas with minimal heat distortion to surrounding areas. “The area in this cavity has details in and around the damaged section that needed to be maintained and therefore avoided,” he says. “Using the laser, I was able to melt the high spots back to the middle and create as flat a surface as possible so that I had a better welding surface.” Hendry says that this is a preferred method because it lets the welder use as much of the original base material as possible, which reduces the amount of added foreign material while also cutting down the post-polishing work that is necessary. “Once we reestablished some of the missing material by evening out the high spots, I went in with a 0.003-inch diameter wire and made multiple passes to build the damaged area back up so that it matched the customer’s prints.”
“Obviously, the laser welding process was key, but the other significant factor was the can-do attitude put forth by Chris Demakis.”
“Our biggest advantage in a case like this is that we have guys like Rick who have been laser welding for about 10 hours a day for 15 years,” Tony Demakis says. “I believe this is unheard of as most welding houses have TIG and laser welders, so they split time between the two and may not use them daily like we do.”
Following the laser welding process, Alliance Project Manager and polishing expert Kirby Jednachowski finished the repair job, blending and restoring texture to the micro-sized cavity. “For years, we have used Diprofil ultrasonic polishing equipment, which enables us to remove minimal stock in a very controlled process. It is ideal for the most intricate parts like this one where sizing and tolerances are critical and re-machining is impossible,” he says. “The part was set up using a 10x microscope so that the area that needed to be polished could be clearly seen.” He says he used an 800-grit ceramic stone to blend out the weld with the existing stock from the tool until it was even. “We did have a sample part that was used to fit in the block, so I needed to be vigilant with stock removal until the part was able to fit into the tool freely. If I did not blend the weld out correctly the part would not have fit. The process was a bit painstaking but worked out perfectly. The result was a satisfied customer with a functioning tool.”
“Chris communicated that they were going to bench this in using a similarly-sized ejector blade and some lapping compound,” Seedorf says. “They just worked it in, and I thought, ‘Wow,’ because so many toolmakers hate the lapping process these days. But, a project like this proves that there is a time and place for it.”
Skills and Confidence Defy the Odds
“Within a couple of weeks and before our required completion date, the repair work was completed and returned,” Seedorf says. “It actually took Alliance just five days to complete the repair, which is pretty quick. The Alliance team also laser-welded the ejector blade corners and fit them by hand into the core block, which was not part of the original conversation. It was incredible.” Team 1 sampled the cavity at its shop, and the repair work was a success. Currently, it runs production on the repaired mold and things are “back to normal,” according to Seedorf.
“Obviously, the laser welding process was key, but the other significant factor was the can-do attitude put forth by Chris Demakis,” Seedorf says. “Many toolmakers have been forced to take full ownership of repair work over the years, and stepping out of the comfort zone of ordinary repair work is unusual these days,” Seedorf says. “This is very short sighted, and it is why most toolmakers walk away from these types of challenges every day. Chris was aware of the criticality and took it very personally to help us out of this jam.”
Related Content
How to Foster Innovation Through a Culture of Education, Mentoring
Dynamic Tool Corp. shares its strategy for building a team with the right attitude and aptitude to deliver innovation that meets customer expectations.
Read MoreCross Training, In-House Capabilities and Collaborative Design Move Helm Tool Forward
Cross-training, bringing it all in-house, molding and collaborative design are essential to Helm Tool's success.
Read MoreMMT Chats: The Science of Moldmaking, Part 2
In Part 2 of this two-part MMT Chat, Christina and Don continue their conversation by exploring lean manufacturing and tips on how to attract, train and retain the future workforce.
Read MoreMold Maintenance Continues to Matter: Enhanced Training Program in a New Facility
I attended a MoldTrax mold maintenance workshop in 2019 and shared my experiences, and despite changes in ownership, the workshop's remarkable value endures, as discussed in a recent Q&A with the current leadership.
Read MoreRead Next
Milling and EDM Automation Reshape Summit Tooling’s Mold Operations
Summit Tooling President Dan Martin credits the capability to run unattended machining 24/7 to the partnership that his company built with Makino.
Read MoreHow to Use Strategic Planning Tools, Data to Manage the Human Side of Business
Q&A with Marion Wells, MMT EAB member and founder of Human Asset Management.
Read MoreHow to Use Continuing Education to Remain Competitive in Moldmaking
Continued training helps moldmakers make tooling decisions and properly use the latest cutting tool to efficiently machine high-quality molds.
Read More
