Ramping Up to 5-Axis Programming
Steps for making the transition from three- to five-axis machining.
Is your shop ready to amp up your mold manufacturing capabilities by upgrading from 3-axis to 5-axis machining? With the trend of 5-axis becoming more prevalent, affordable and easier to use, machinists across the world are making the necessary adjustments to take their shops to the next level.
Five-axis machining has some excellent benefits, including eliminating multiple setups, getting better tool performance, and obtaining better surface finishes; however, some shops are not sure where to start the transition.
Where to Begin
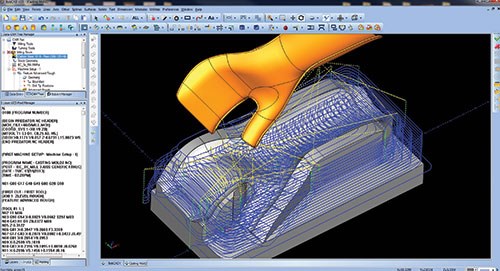
It all begins with design. Before a part can be programmed, the shop needs a CAD file from which to work. So if you want to ramp up to 5-axis faster, consider using an integrated CAM solution.
This is an area of 5-axis programming that shop owners can take advantage of by working in their current primary design software. If your CAD vendor offers integrated CAM, you can short-cut the learning curve by working in your native CAD environment. This is by far one of the larger hurdles a shop must overcome when transitioning to 5-axis.
It is much easier, more cost-effective and less time-consuming to lay down some cutter path in the shop’s current design solution than it is for staff to learn the personality of an entirely new design package.
Many CAD vendors recognize the need for CAM as an integrated solution, and professionals are predicting that it will become a standard in the next few years for CAD vendors to offer integrated CAM. Not only does it make program 2- to 5-axis more comfortable, but it also eliminates data translation errors; and for most, it offers a parametric environment that makes simpler work of late-stage design changes.
Transition with Training
Though using a CAM-integrated solution helps ease the transition from 3- to 5-axis, the true power and versatility of 5-axis programming can only be found with software training. Throughout the years mold manufacturers have seen CAD/CAM products promote mold-specific tools, which boast huge advancements in saving time and providing better designed and better machined parts; however, the reality is that no CAD/CAM software can replace a good machinist.
The gap between designing and programming parts correctly and actually machining the part correctly is filled by the honed skill set of a master moldmaker. This holds true with 5-axis programming. Because of the skill level needed, in order to truly ramp up from 3-axis programming to 5-axis programming, shop machinists will require training to be fully fluid in 5-axis machining.
Transition with 4-Axis
But don’t let the amount of training cause hesitation. Taking steps to utilize multiaxis doesn’t necessarily mean you need to start with 5 axis. If you can master the concepts of 4 axis, they will roll over to 5 axis, so for many shops this is a great stepping stone to becoming a 5-axis shop.
Most machine tool vendors offer bolt-on 4-axis rotary tables. Starting with a 4th axis eliminates one axis that you have to consider while working. Not all mold machining is cavity work, and there is much supported machining that can be done on a 4th axis.
Taking this step to enter the multi-axis world can ease the transition, and for some shops that may mean mastering 4 axis before moving on to 5 axis. If your CAM vendor subscribes to modular technology, it should be easy for you to add the 4-axis toolpath options and start cutting parts.
Transition with 3 + 2 Positioning
A large portion of machine shops use 5-axis machines for 3 + 2 positioning, and for the mold manufacturer this may be a good start. Just like a 4th axis bolt-on, a trunnion table can be bolted to a VMC. This option gives you X Y Z B C program, 3 linear axis and 2 rotary—offering you the option for 3 + 2 or 5-axis simultaneous.
This is just one of many machine configurations supported in 5-axis—known as a table-table setup. Being able to machine five sides of your part in a single setup can prove to be useful for electrode machining, and it will also allow you to start using the tilting strategies used with shorter tools. Working on smaller parts that are used in your mold design will allow you to master 5-axis techniques without the risk of crashing into a very expensive mold tools.
Transition with Shorter Tools and Machine Simulation
A key advantage to 5-axis programming is the ability to do more with shorter tools. The longer your tool hangs out, the more likely you are to experience chatter and poor surface finishing. By using shorter tools, shops achieve better finish quality; however, this also puts machinists in danger of collisions with the workpiece, toolholders, spindle and/or setup.
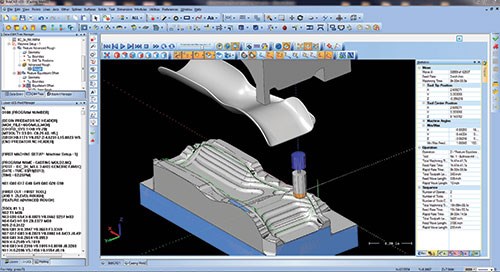
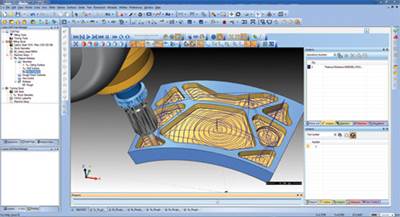
This is the reason full machine simulation for 5-axis machining is so important. In a 3-axis environment, you may not have utilized full machine simulation, but when running full 5-axis, it’s the key to eliminating crashes. It also is used as a tool to help you design your setups and fixtures. Machine simulation is an absolute must in order to fully utilize a 5-axis machine.
Using shorter tools, and having your machine rotate away from collisions to do so, may be part of your motivation to move to 5-axis.
Another motivation for moving to 5-axis is simply to stay current with technology. Five-axis programming is becoming more and more common in the moldmaking marketplace, and available low-cost options make it affordable for shops to stay up-to-date and competitive.
Making the Move
There are clear benefits for moldmakers to migrate from 3-axis to 5-axis equipment and CAD/CAM software. What is unclear for most users is the investment needed to take these concepts and make them a reality in their shops.
This is where some low-cost solution providers shine because they ride technology trends and implement proven concepts for off line CAD/CAM programming. Through these efforts there are complete lines of CAD/CAM software for 2- to 5-axis programming available today for mold manufacturers of all sizes and levels, making it easier for them to invest in the necessary training to implement new toolpath options, which will reduce run times, improve surface finish and allow for better parts production.
Implementing these new options will take time—time to learn the options in the software and knowing when to use them—but it is all part of the investment. The sooner you start, the sooner you’ll be taking advantage of them.
Related Content
Mold Design Review: The Complete Checklist
Gerardo (Jerry) Miranda III, former global tooling manager for Oakley sunglasses, reshares his complete mold design checklist, an essential part of the product time and cost-to-market process.
Read MoreIt Starts With the Part: A Plastic Part Checklist Ensures Good Mold Design
All successful mold build projects start with examining the part to be molded to ensure it is moldable and will meet the customers' production objectives.
Read MoreOEE Monitoring System Addresses Root Cause of Machine Downtime
Unique sensor and patent-pending algorithm of the Amper machine analytics system measures current draw to quickly and inexpensively inform manufacturers which machines are down and why.
Read MoreHow to Analyze and Optimize Cutting Conditions to Reduce Cycle Time
Plastic injection mold design and manufacturing company puts NC program optimization software module to the test. The results were surprising.
Read MoreRead Next
The Benefits of Modular CAD/CAM
Modular CAD/CAM software allows different software functionalities to be available independently of one another.
Read MoreHow to Use Strategic Planning Tools, Data to Manage the Human Side of Business
Q&A with Marion Wells, MMT EAB member and founder of Human Asset Management.
Read MoreAre You a Moldmaker Considering 3D Printing? Consider the 3D Printing Workshop at NPE2024
Presentations will cover 3D printing for mold tooling, material innovation, product development, bridge production and full-scale, high-volume additive manufacturing.
Read More

