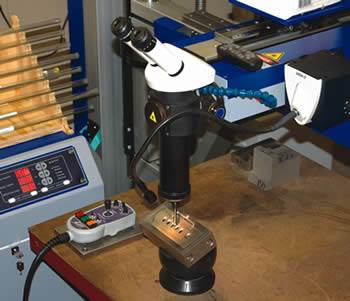
Laser Engraving/Marking: A Complement to EDM’ing and Milling
Laser technology may have a place in your mold build process when it comes to engraving and marking.
Laser technologies like engraving (the ablation or removal of metal) and marking (changing the surface of the metal) are emerging in the moldmaking industry—both as an alternative to EDM and some milling processes that involve small detail to meet the increasing need for parts identification and traceability in the manufacturing process and in finished products as well as a complement to these processes. These laser technologies offer benefits like smooth surface finish, matched texture patterns on molds as well as cost- and time-savings.
Not only are moldmakers and molders looking at ways to mark molds whether it be a warning label, part number, cavity ID number or recycling codes, laser technology also can be employed to texture molds and engrave cavities—all without investing in additional items like materials and fluids. Moldmakers can perform these functions by purchasing laser machines or this work can be outsourced.
How Lasers Work
The word laser is an acronym for Light Amplification by Stimulated Emission of Radiation. Lasers use a process called stimulated emission to amplify light waves. A substance normally gives off light by spontaneous emission. One of the electrons of an atom absorbs energy. While it possesses this energy, the atom is in an excited state. If the electron gives off this excess energy (in the form of electromagnetic radiation such as light) with no outside impetus, spontaneous emission has occurred.
Steve Finneseth, sales manager for High-Tech Laser & Polishing (Lee’s Summit, MO)—a service provider of precise and micro laser engraving, for industrial mold components including cavities, cores, dies and inserts—states that laser engraving can engrave on many different materials from carbide to various plastics with sharp detail and resolution. He recalls that when High Tech Laser bought its first Nd/Yag laser the focus was on trying to achieve a controllable depth into the part with an even floor finish. Today, the floor finish of the engraving may vary from a burnished (very smooth), to a fine EDM (which is standard), or even match a specific call out for a texture. The depth of the engraving can be from .0002" to .075" or greater if necessary—depending on the specific needs from the customer.
“The Nd/Yag laser uses a Q-switch to generate pulses,” Finneseth explains. “The pulses can be adjusted, somewhat similar to feeds and speeds on a mill, depending on how deep you need to engrave. The laser beam is vaporizing the material from a solid to a gas. When a common person hears the word laser engraving they probably have a CO2 laser in mind, which is used to cut a wide variety of plastics and ferrous or non-ferrous metals. A typical CO2 laser would be 1000 watts for laser cutting as compared to a 100 watt Nd/Yag system that is common for laser engraving. The word YAG comes from Yttrium (rare metallic chemical), Aluminum (silver-white malleable ductile light metallic element that is most abundant in the earths crust) and Garnet (transparent deep red mineral, sometimes used as a gem). A Yag laser can engrave on aluminum, copper, carbide, carbon graphite for electrodes, and hardened or non-hardened tool steels, as well as many different plastics.
Finneseth notes that with a laser one can engrave on the sidewalls of a mold or in a pocket or hidden cavity, but the user must have a direct line of sight, which can be attained if the laser is tilted at an angle. “It’s like shining a flashlight into a tube,” he says. “As long as the line of sight reaches down there, it is capable of being engraved, whereas a cutter or mill does not have that capability. The laser beam itself has a very sharp, crisp corner—unlike a mill or cutter, which has a rounded corner.”
“When using the laser for an application you are relying on a beam of light to remove the material,” Finneseth adds. “This works by a beam of light reflecting off mirrors from the back of the laser rail to the front of the rail until it builds up enough intensity. Once it has enough intensity the Q switch opens and lets the light pass through the beam expander (telescope) to the galvo head. Inside the galvo head there are mirrors that directs the beam onto the surface being engraved. On some lasers you have the ability to control the beam size through an aperture. For example, small or micro engraving you would use a smaller aperture to keep the detail of the engraving crisp and sharp. For larger text or logos you would use a larger aperture to have a higher material removal rate.
According to Roy Gessman, sales director of laser manufacturing company Crafford LaserStar (Riverside, RI), companies that provide laser engraving equipment also design software to work with the systems that help ensure repeatability since everything is computer-driven. Such software should offer the ability to create different logos, export serial numbers, etc. “This software should be easy to learn and flexible,” Gessman says. “The user should be able to set up a program that will mark or engrave the information on the mold, then position the actual piece in the work area of the laser, hit run, and the laser marks or engraves the piece.” Gessman adds that a laser engraving equipment manufacturer should be willing to work with moldmakers and understand what their true requirements are along with their budget for machinery.
| Figure 1 | |||
| Machine Type |
Milling Time (HR) |
Ending Time (HR) To Produce Part | Total Time (Hours) |
| Milling/EDM | 1 | 9 | 10 |
| Laser | 0 | 2.2 | 2.2 |
| A comparison of milling/EDM/laser times. The following data was collected using a hardened, circular steel die with a Rockwell count of 40 to 50. This application required 25 characters raised to 0.008" in an area of 3" x 0.4". (Programming time is not included). Figures courtesy of Virtek Laser Systems North America. | |||
Laser Applications
Marking
Tim Rose, president of engraver Caliber Engraving (Brea, CA)—with 50 percent of its business coming from mold shops—notes that laser marking puts a dark mark on a steel or metal surface, much like a shallow etching. “Many moldmakers use marking for bar coding, product identification, serializing, etc. Laser marking is the new alternative to electrochemical etching and stamping data onto components at a fraction of the cost of deep laser engraving.” Many moldmakers mark mold components with either their own company name or a customer’s name, tool number, etc., to make the mold package more professional,” Rose adds.
According to Gessman of Crafford LaserStar, marking is simply a color change. “Often, when a material is sensitive and has thin walls, marking is more suitable than engraving,” Gessman says. “Sometimes, the metal density isn’t there to have some of it removed, a permanent mark is wanted.”
Engraving
Laser engraving actually cuts into the metal’s surface and removes it. According to Linda McIntosh, product marketing manager for Virtek Laser Systems North America (Waterloo, ON)—a provider of high value laser-based templating, inspection, marking and engraving products and total systems integration solutions—typical laser engraving applications in the moldmaking industry include texturing and patterning molds, deep engraving features directly on to the mold, engraving EDM electrodes, and engraving or annealing metal parts with product identification or serializers.
| Figure 2 | ||||||||
| MILLING |
|
|
EDM |
|
|
LASER |
|
|
| Cost of Tooling |
|
|
Cost of Electrodes |
|
|
Cost of Consumables |
|
|
| Cost of Tool | $100.00 |
|
Cost of graphite electrode | $33.00 |
|
Cost of Consumables/hr | $4.82 |
|
| Lifetime of tool (hours) | 80 |
|
# of electrodes | 3 |
|
Water, filters, lamp |
|
|
| Total cost of tooling for 1 hr |
|
$1.25 | Total cost of electrodes |
|
$99.00 | Engraving time | 2.2 |
|
|
|
|
|
|
|
|
Total cost of consumables |
|
$10.60 |
| Maintenance Cost |
|
|
Maintenance Cost |
|
|
Maintenance Cost |
|
|
| Maintence, % operation time | 6 |
|
Maintenance, % operation time | 2 |
|
Maintenance cost/hr | $0.64 |
|
| Operation time (hrs) | 1 |
|
Operation time (hrs) | 9 |
|
Engraving Time (hrs) | 2.2 |
|
| Labor and overhead cost/hour | $27.00 |
|
Labor and overhead cost/hour | $27.00 |
|
Labor and overhead cost/hour | $27.00 |
|
| Total Maintenance Cost |
|
$1.62 | Total Maintenance Cost |
|
$4.86 | Total Maintenance cost |
|
$1.41 |
| Total material and maintenance cost of Milling/EDM | $106.73 | Total materials and maintenance cost of Laser | $12.01 | |||||
| A comparison of milling/EDM/laser costs. | ||||||||
According to Caliber Engraving’s Rose, deep laser engraving, which replaces traditional milling and chemical etching methods and allows for depths ranging from .0002-.125 inch. “This is commonly used when you are engraving with a depth-of-cut so that the image can be seen in the product that comes out of the mold,” Rose explains. The plastic fills into the engraving and you see the image on the plastic part” He adds that laser engraving is the preferred method of the majority of its customers. “Our mold shop clientele is very particular about details and accuracy of the work because they spend tens of thousands of dollars constructing molds and components.”
Laser Advantages
Alternative to EDM/Milling
“Laser engraving can virtually eliminate the need to mill or EDM small and medium-sized cavities and thus offers significant cost savings,” Virtek Laser Systems’ McIntosh notes. “In today’s competitive world of moldmaking, manufacturers must take advantage of ways to be faster and better thus creating an edge over the foreign moldmakers.”
Saving Time/Money
“Job shops have found that saving time (see Figure 1) is only part of the benefits of converting to laser marking and engraving,” McIntosh comments. “They also can eliminate the cost of materials (typically graphite or copper), manufacturing of the electrode, and reduce maintenance and service costs and reduce consumable costs like dielectric fluids, milling coolants, etc. (see Figure 2).”
Rose of Caliber Engraving can attest to the faster turnaround times. “We can turn jobs around much faster because the amount of time required to laser a mold cavity as compared to traditional methods, faster and with a much higher quality result,” he states. “It’s a much more controlled environment as well; your setups are more predictable since you project the laser onto the surface and use a fine setting to see the image on the part before you actually cut it.”
Longer Life
A laser beam doesn’t wear out like electrodes, cutting tools or drills do, Finneseth of High Tech Laser maintains. “Maintenance on the lasers mainly consist of changing the water and filters,” he says. “Lamps also are a common replacement item on the lasers and after several thousands of hours, the Q-Switch, Yag Rods, and Optics will need to be replaced.”
Smoother Surface Finish
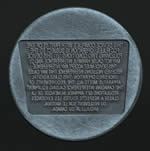
McIntosh notes laser engraving offers a superior surface finish when comparing milling surfaces and finer contours in small areas. Moldmakers can eliminate hand polishing or smoothing of the laser surface,” she states, “due to the to the smoother finished surface of a laser compared to milled surfaces. In many cases, the laser meets the required finish. Lasers can offer a good surface roughness as standard (Ra<0.8 µm). Packaging industries—such as cosmetics—and the coin industry are driving machining equipment manufacturers to find ways of improving the finishing of their molds and dies (see Figure 3).”
Rose of Caliber Engraving adds that the finish the laser creates greatly reduces the amount of secondary finishing the polisher would have to do when the engraving is done, and in most cases because of the fine laser finish, no secondary finishing is required. “The quality is far better with a laser,” Rose affirms.
Engraves Contours Easily
James Garcia, Technical Director of Precision Laser Technology (Rochester, NY)—whose mold shop customers total approximately 70 percent of its business—notes that engraving on contours is very easy with a laser and very difficult with milling. “The laser will follow slight contours of a part within limitations,” Garcia comments. “The same engraving would require extra programming with a traditional CNC mill. Additionally, laser engraving is an earth-friendly process that uses no chemicals.
Less Mold Stress/Wear
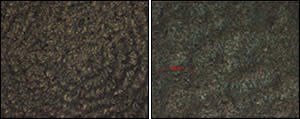
In addition, laser engraving does not affect the hardness of the finished surface of most metals to the same degree as EDM erosion, according to McIntosh. “The affected zone from EDM eroding can create micro-fracturing, which is unacceptable to industries such as aerospace and the medical industry,” she says. “For the mold manufacturer, a hardened surface creates challenges in preparing a clean, polished surface. Figure 4 displays a microscopic view of a laser engraved and an EDM surface, which clearly shows the differences in the edges.”
Laser Limitations
Laser equipment manufacturers and laser engravers emphasize that laser technology complements EDM’ing and milling, and should not be a replacement. “Laser engraving will not replace milling if there is a large amount of material removed,” Virtek’s McIntosh states.
In agreement is Rose of Caliber Engraving. “For stock removal, such as cavity work where there is not an engraving application, milling is far more efficient than lasering,” he says. “Laser is advantageous in the EDM arena only when the area that is to be EDM’d is super detailed. I would not generally recommend lasering as an alternative to EDM or milling.”
Working in Harmony
Laser engraving/marking presents a viable alternative for mold manufacturers to investigate if they are doing small, intricate work. And, lasers—working in conjunction with EDM’ing and milling techniques—allow the moldmaker quick turnaround times, time and money savings, longer tool life and smoother surface finishes. These processes can all work together to not only improve production processes but also make mold shops more competitive.
Related Content
Portable Low-Heat, Non-Arcing Resistance Welder for Mold Repair
Rocklin’s user-friendly MoldMender Micro Welder delivers simple and cost-effective localized repair in-house with precision and versatility, enhancing mold and die durability and reducing disassembly and downtime.
Read MoreHow to Use Thermal Management to Improve Mold Cooling
A review of common mold cooling issues and possible solutions, including 3D printing applications.
Read MoreLaser Welding Versus Micro Welding
The latest battle in finely detailed restoration/repair of mold materials.
Read MorePrecision Welding Services Offer Rapid Turnaround Mold Repair and Reduced Molder Downtime
X-Cell Tool & Mold relies on outsourced, high-quality welding repairs from Lewis-Bawol Welding to ensure its customers' molds are back in production quickly and affordably.
Read MoreRead Next
In-House Welder Saves Time, Boosts Productivity and Creates New Market Opportunities
Laser welding system increases moldmaker’s ability to meet its customers’ cost and timing demands while also increasing efficiency and output, and creating niche opportunity for mold repair outside its doors.
Read MoreHow to Use Strategic Planning Tools, Data to Manage the Human Side of Business
Q&A with Marion Wells, MMT EAB member and founder of Human Asset Management.
Read MoreReasons to Use Fiber Lasers for Mold Cleaning
Fiber lasers offer a simplicity, speed, control and portability, minimizing mold cleaning risks.
Read More






.jpg;maxWidth=300;quality=90)


