Ensuring a Long Machine Tool Lifecycle
Save time, money and aggravation by taking care of your machine tools with a lifecycle approach.
There are as many methods for proper preventative maintenance of machine tools as there are service mana-gers. Here we will introduce the best ideas from some successful maintenance programs so that you can develop a scientific method of taking care of your highly advanced CNC machine tools.
We need to start out by determining what the lifecycle of your machine tool actually is. This can vary widely depending on your use, but let’s say for argument’s sake that we are talking about a mold shop. Most of your mold shop machines are going to be of the box way variety. With the box way construction you can probably expect 10 years of hard mold shop work out of a CNC machine if you service it properly.
Lifecycle Determination
Now that we have a goal—10 years of service—let’s talk about what kind of quality of life we need to maintain. In 10 years time the accuracy requirements of your equipment will be even greater than they were when you purchased it. You are going to have to stay on top of things like gib and backlash adjustment to be able to keep up with these increasing demands on the machines.
Not only that, if your machines are continually down for service you run the risk of losing your jobs to competitors and you also are not going to like the expense and aggravation of flying parts around the world. Let’s face it, that huge expensive machine is here to stay and you might as well turn it into an asset from day one by taking care of it.
The justification for a maintenance program is difficult at first, because you need to explore the payback in the form of what would have happened if you didn’t have the program. The tip here is to introduce the cost of a preventative maintenance (PM) program at the time you purchase the machine.
Any machine distributor will offer you a recommended spare parts list for the machine; estimate the cost to do the testing of the machines; and, add the recommended spare parts. You can project that cost over five years and add it to the amount that you need to buy the machine. This way you don’t have to hear “We don’t have budget for a PM program this year.”
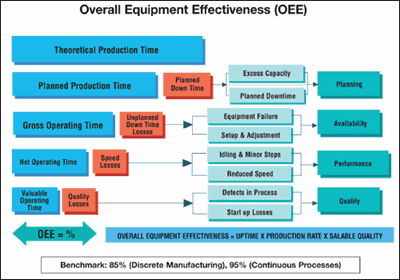
Measuring the success of your PM program is as tricky as justification. As a general rule, if your machine is unavailable to you because of maintenance problems more than 2 percent of the time, you are doing something wrong.
Even the lowest end machine tools available should have no more downtime than that. The uptime percentage works the best here because it is a testament to all aspects of your PM program. Do you stock recommended spare parts, do you service your machine on a regular basis, etc.
PM Program Design
Before we get into the basics of your PM program, we need to set down two ground rules for the program:
- Repeatability
You must be able to repeat the test the same way each time on each machine. Remember, scientific method. - Documentation
You need to set up a form with the following items to be listed:
a. Interval of test
b. Results of each test
c. Action taken (gib adjusted, voltage adjusted etc.)
d. Comparison to last time tested
Eight Tests
Now let’s take a look at what needs to be tested and when. As always, check with the manufacturer to find out how to perform each test and the recommended interval.
- Level. Machine level on any bed-type machining center is critical. If your machine is not properly level upon installation, you could quickly develop a problem with the bed of a permanent nature. Your machine will not cut properly if it is not level. You should re-level the machine three, six, nine and 12 months after installation and then every six months after that. Use a precision level and check with the manufacturer for the desired tolerance.
- Gibs. A gib that is pushed in too hard is as destructive to accuracy as a loose gib. Your machine’s control should have an indicator or diagnostic parameter for servo load. As you adjust each gib, check the load to make sure it doesn’t creep up as you tighten. Adjust the gibs per factory spec every six months and then remove and inspect gibs for uneven wear every 12 months.
- Ballscrews and TAC bearings. Most all machining centers have self-lubricating ballscrews. Check with the manufacturer and make sure. If you don’t have self-lubricating screws, grease the screws by hand every 12 months. A good test for TAC bearings is to set an indicator on the machine base and position the needle at the end of the ballscrew opposite the motor. If the screw moves back and forth more then .002" as you change direction with the hand wheel, chances are the TAC bearings are shot. Move to backlash adjustment before ordering parts.
- Backlash. You may be able to take some of the slop out of a bad TAC bearing with the machine’s backlash adjustment (electronic compensation). If it’s over .002" this will be counterproductive. The way to check backlash is in rapid feed with a
programmed move of 4 inches away from a surface with an indicator needle and 4
inches back. Perform this test after taking out all of the backlash with the hand wheel before the programmed move. You can figure out how many increments to add to your backlash parameter by divid-ing resolver increments by motor pulses and adding the phases of the moon for that day or you can add two digits per .0001" of comp desired and see how much change you have. Check backlash every six months. - Spindle. Check the spindle taper by bluing up a test bar or the newest toolholder you have and clamping in the spindle. Make sure you don’t see any bell mouthing or uneven wear pattern on the die left in the spindle taper when you remove the holder. Check run out by touching an indicator needle to the taper and rotating the spindle. Run out of more than .0003” should be a red flag. Run the spindle up to its max rpm for 5 minutes and check for excessive heat buildup. Repeat at six month intervals.
- Ballbar Test. The ballbar test is becoming more and more prevalent as the end all test for machine accuracy. Simply stated, the ballbar test is where you move an indicator around a steel ball attached to the machine’s spindle to test true axis movement. Ballbar test equipment is pricey; about $10,000 plus the cost of a laptop computer and the software to go with it. The nice thing about a ballbar test is that it gives you a hard copy of the machine characteristics when the machine is new, so that you have a target when you are doing your PM. If you don’t have enough machinery to justify the expense, make the machine manufacturer ballbar test the machine as part of your acceptance of the installation and then pay someone to come in once a year to do it.
- ANSI. The ANSI B5.54 standard for machine tools has a one day test that is quite inclusive and easy to do.
- Electrical Tests. Clean out your machines electrical cabinet once a year. Don’t use compressed air. And change the filters in the heat exchanger. Check the currents and voltages as specified by the manufacturer. There are not a lot of end user accessible check points on today’s controls, but you should make sure your three-phase is consistent and check where you have access.
Discipline Is Everything
You need to schedule time to maintain your machine tools—no exceptions. It isn’t that difficult and if you need to, you can always pay the manufacturer to come in and do it for you. You might even consider having the manufacturer come in and show you how to do proper PM on your machines. Much of what was discussed here seems like common sense, but you would be shocked to hear how many companies have no PM program at all.
Related Content
Solving Mold Alignment Problems with the Right Alignment Lock
Correct alignment lock selection can reduce maintenance costs and molding downtime, as well as increase part quality over the mold’s entire life.
Read More6 Ways to Optimize High-Feed Milling
High-feed milling can significantly outweigh potential reliability challenges. Consider these six strategies in order to make high-feed milling successful for your business.
Read MoreLaser Welding Versus Micro Welding
The latest battle in finely detailed restoration/repair of mold materials.
Read MoreMaintaining a Wire EDM Machine
To achieve the ultimate capability and level of productivity from your wire EDM on a consistent, repeatable and reliable basis, regular maintenance is a required task.
Read MoreRead Next
Maintaining a Wire EDM Machine
To achieve the ultimate capability and level of productivity from your wire EDM on a consistent, repeatable and reliable basis, regular maintenance is a required task.
Read MoreDeveloping an Effective Machine Tool and Spindle Service Program
To get ahead of the competition your shop must use and maintain its available resources by achieving a high level of overall equipment effectiveness
Read MoreHow to Use Continuing Education to Remain Competitive in Moldmaking
Continued training helps moldmakers make tooling decisions and properly use the latest cutting tool to efficiently machine high-quality molds.
Read More
