Mold Development with Digital Shape Sampling and Processing
Use digital shape sampling and processing to produce more accurate molds, free up machine time for CNC systems used in milling and drastically cut the time it takes to develop a new mold.
To most people, a container is just something that holds a product. But for Uniloy Milacron customers, the container is an integral part of what defines a brand.
Uniloy Milacron is a leading provider of blow molding systems and services. The company became an early leader in the blow molding industry 30 years ago by developing new cutting machinery and patenting a hollow-handle plastic bottle design for the dairy packaging market. Through the years, the company also has developed patented machining solutions for trimming, handling and increased automation.
One of the company’s most significant recent innovations is the use of digital shape sampling and processing (DSSP) to develop new molds for plastic containers. The DSSP services are provided by GKS Inspection Services, a division of Laser Design Inc. GKS uses its laser design scanners to capture geometry of the plastic containers and Geomagic Studio software to process scan data into accurate surface models for downstream CAD and machining.
“This new process has many benefits,” says Jim Janeczek, product design engineer for Uniloy Milacron’s facility in Tecumseh, MI. “It has enabled us to produce more accurate molds, free up machine time for CNC systems we use in milling and drastically cut the time it takes us to develop a new mold.”
Replicating a Complex Shape
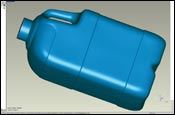
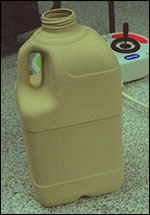
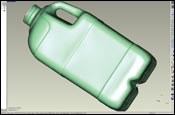
A recent project is typical of the work process between Uniloy Milacron and GKS, based in Plymouth, MI. In this case, Uniloy Milacron presented GKS with a two-liter plastic milk bottle to duplicate. Although it might look like a basic container when resting in a refrigerator, a typical milk bottle is fairly complex and difficult to replicate using CAD programs.
“We use Pro/ENGINEER to design new containers from scratch,” says Janeczek, “but we needed to apply different technology to duplicate our customers’ designs.”
The ability to quickly capture and model existing physical objects containing free-form shapes defines the difference between CAD and DSSP.
As a drawing-based technology, CAD starts with a blank screen, requiring that the user input dimensions, shapes, curves and surfaces that will define an object. It is great for modeling new products, but is limited when faced with describing or representing the complexity of the existing world, especially free-form shapes—such as those found in plastic milk containers with molded handles.
DSSP starts with a physical object such as an existing product or prototype. High-speed scanners capture the shape of the object and the resulting point-cloud data is fed into fully automated software, such as Geomagic Studio. The software is the critical component of the process: it extracts geometry and topology from measurement data and creates high-quality digital models that can be used by CAD/CAM/CAE applications for downstream functions such as engineering analysis, simulation and machining.
“Geomagic Studio provides the simplest, fastest and most accurate way to digitally duplicate a part,” says Han Le, the GKS engineer who headed up the Uniloy Milacron project. “You can model the part without taking physical dimensions and get a CAD model with accuracy within +/- 0.0025 mm (+/-0.0001 inches).”
Millions of Points in Minutes
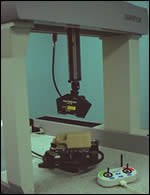
Le used a Laser Design DS 3040 scanner to capture the two-liter milk bottle. Although the DS 3040 offers the option of using a contact probe for CMM, the clear choice for this project was faster, non-contact scanning.
“With a regular CMM system you wouldn’t be able to get results that are as accurate as those from the DS 3040,” says Le. “You’d have to use a touch probe, and how many times can you touch the part to get accurate dimensions? Plus, for a soft, flexible part, you wouldn’t get accurate data because the probe would change the physical shape of the part.”
A major advantage of the Laser Design system, according to Le, is the ability to scan the container from all orientations using a rotary platform then easily integrate the data into a common coordinate system.
It took about an hour to scan the milk container, resulting in a point cloud containing approximately two million points. This compares to 24 hours that it used to take Uniloy Milacron to capture a container with a CNC system hooked up to a digitizing attachment. The CNC digitizer captured thousands of points, compared to the millions collected by the Laser Design scanner in a fraction of the time. In addition to providing greater accuracy in less time, the new process helps with work flow and scheduling according to Uniloy’s Janeczek.
“When we were doing this in-house, we needed to vie for time on the CNC machine, which is a vital tool for our milling operation,” says Janeczek. “With GKS providing the scanning and data processing, the CNC machine can be dedicated full-time to milling tasks, and we don’t have to worry about scheduling time to use it.”
The Points-to-Surfaces Transformation
After the points are captured by the Laser Design scanner, they are brought into Geomagic Studio, which provides automated tools for registering scans, decimating dense data sets while maintaining accuracy, correcting scanner errors and filling holes.
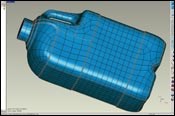
The completed point-cloud model is converted into a polygon model using patented wrap triangulation algorithms provided by Geomagic Studio. Function-ality is provided to quickly and easily create a clean polygon model with the software automating such tasks as creating geometry for areas not captured by the scan, optimizing polygon density, fixing overlapping intersections and editing polygon attributes.
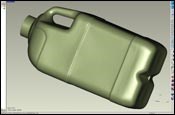
The final step is to create the NURBS surface model that can be used directly within a CAD system. When advanced control is not necessary, Geomagic Studio can complete this step with one click of a mouse. In the case of the two-liter bottle, Le wanted to finely tune certain regions requiring greater detail. For this work, he used Geomagic Studio features for patch optimization, adaptive surface fitting, and contour detection and extension.
“From the polygon phase to shape phase to finished CAD surfaces takes about an hour,” says Le. “Geomagic Studio makes it intuitive to lay out patches automatically or manually in areas where finely detailed geometry is needed.”
The completed model is saved as an IGES file and sent to Uniloy Milacron for import into Pro/ENGINEER.
“It used to take us about three or four days to get a point-cloud model we could work with,” says Janeczek, “Now, in less than a day, GKS delivers a more accurate CAD model that can be imported directly into Pro/E for finishing touches.”
The model typically requires a couple hours of work in Pro/E, according to Janeczek. This includes operations such as putting a finish on the neck of the bottle, adding a thread for the cap, engraving the bottom with the recycling code and model numbers, and perhaps adding a customer logo.
After Pro/E work is completed, the model is sent to Uniloy Milacron’s mold design and programming team, which uses it to create a cavity for the mold, determines which machine is best suited to cut the cavity, and prepares the digital file for the selected machine. In the case of the two-liter bottle, Uniloy Milacron used an A55 Makino system to cut the mold. Following cutting, the mold is finalized with polishing and other custom handwork.
Greater Accuracy in Half the Time
The new process has cut in half the time it takes Uniloy Milacron to capture an existing container and create a new CAD model. What once took four to five days can now be completed in two days or less, according Janeczek. The greater accuracy and time savings enable Uniloy Milacron to maintain its exacting standards while putting more projects through the production pipeline.
Implementing DSSP to speed design, create more accurate molds and free up time for CNC machines used in milling exemplifies the Uniloy Milacron philosophy of delivering the most cost-effective processes for producing unique containers.
In a world where containers are often taken for granted, Uniloy Milacron and its customers realize that high quality packaging can make the difference between a bottle of milk that lingers past its sell-by date on a store shelf and one that’s being consumed from a home refrigerator.
Related Content
How to Use Scientific Maintenance for More Accurate Mold and Part Troubleshooting
Discover how adopting scientific maintenance approaches helps improve mold lifespan, minimize failures, and optimize production outcomes.
Read MoreConfronting the Mold Design Talent Drought
Recently, I reposted on LinkedIn the results of an informal survey we conducted, which revealed a shortage of skilled mold designers. It quickly gained a lot of traction. Given the response, I thought I'd summarize the feedback and keep the conversation going.
Read MoreMMT Chats: Eliminating the Noise to Stay Focused on the Customer
Metro Mold & Design joins me to discuss the value of the 80/20 rule as a business strategy, its talented cross-functional team, the role of automation in mold building and molding, and the continuing impact of COVID-19.
Read MoreMaking Mentoring Work | MMT Chat Part 2
Three of the TK Mold and Engineering team in Romeo, Michigan join me for Part 2 of this MMT Chat on mentorship by sharing how the AMBA’s Meet a Mentor Program works, lessons learned (and applied) and the way your shop can join this effort.
Read MoreRead Next
Machine Tool Probing for Moldmaking
It’s time to look at the probe as a device that can literally be used as a Virtual Operator to perform many of the everyday, time-robbing processes that eat into your profitability.
Read More3-D, Non-Contact Scanning for Inspection: Info for Moldmakers
Understanding the differences and similarities between CMM and 3-D scanning allows moldmakers to adapt to, apply and leverage 3-D scanning technology within their shop environment.
Read MoreHow to Use Strategic Planning Tools, Data to Manage the Human Side of Business
Q&A with Marion Wells, MMT EAB member and founder of Human Asset Management.
Read More



.jpg;maxWidth=300;quality=90)


