Case Study / Inspection & Measurement
Using Portable CMM Technology to Improve Moldmaking Processes
Injection molding as we know it is among the most widely-used and effective means to rapidly produce products and prototypes, at high volumes, for a wide-range of uses. By its very nature, the entire process relies on the integrity and accuracy of the mold to ensure that each pocket comb, bottle cap, dashboard, etc. is identical to the one that precedes it. Heated polymers are heated polymers, and they’ll adapt and conform to whatever space will hold it. It is the quality of that space that is integral to the process, and Columbus, IN-based Precise Mold knows that fact better than most.
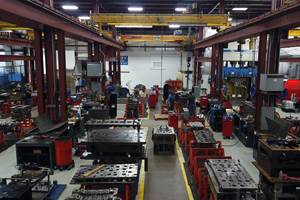
Since 1979, Precise Mold has been making, designing or repairing production molds for customers across many industries. They also specialize in injection mold production, reverse engineering and in the fabrication of models through stereolithography (SL), a process that uses a UV laser to photo-cure epoxy-based resins and build layered models from three-dimensional electronic data. Precise is dedicated to using technology to deliver the best value to their customers and in doing so, has become one of the industry’s leading, single-source manufacturers of injection molds. Precise has seen much change in its three decades of operation. The one constant, though, is the need to ensure the accuracy of their products. With injection moldmaking, just a small flaw in a mold can lead to hundreds or even thousands of flawed products later on.
Precise sought a cost-effective way to facilitate the measurement of their products while allowing the flexibility to find deviations in injection molds of varying size. The size of the company’s molds varies greatly—from 500 to 30,000 pounds—so the solution needed to be both effective and flexible. Precise is diligent in checking parts against the original CAD design and finding any flaws before products move into production. Traditional forms of inspection involve transporting the part to a fixed CMM, which is big, expensive, cumbersome and too often so far away that a 15-ton mold cannot be easily moved to it for checking. After considering multiple options, Precise Mold decided that a portable CMM solution—one that could be transported to the production floor and take measurements within the tolerances of a fixed CMM—would be the best option.
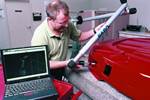
Precise arrived at FARO Technologies, and their Platinum FaroArm®, to provide the solution they needed. The FaroArm provides the combination of accuracy and portability that Precise and their customers demand, and it came at a fraction of the cost of a traditional fixed CMM. The arm is light enough to be transported to the part that is to be inspected, rather than the other way around. This particular arm articulates on seven axes. It works by determining the angle of each rotating axis within the arm using optical rotary encoders. These encoders count rotations incrementally via detection of accurately-spaced lines on a glass grating disc. Software converts the counts into angle changes and subsequently, measurements to within .0005”. The FaroArm that Precise chose also provides a large measurement radius so large cylinders, planes and circles could all be measured on-the-spot and on-the-part.
One particular advantage to using a portable versus fixed CMM in checking molds: Precise can calculate measurements for SPC and GD&T analysis reports more quickly than ever before. They can also check engineering changes to a mold by mounting the FaroArm next to it, verifying the altered area and producing a digital model. Operators then lay the model over the original CAD design to determine if the correct changes have been made or if additional ones are needed. Considering that the company’s goals are reducing leadtimes, improving mold performance and reducing customer cost, these abilities are especially important. Said one arm operator, “We use [the arm] every day.”
Talk to anyone close to the injection mold production process at Precise, and they’ll tell you the real value of implementing portable CMM technology at their facility. Using a measurement arm, they have been able to improve the accuracy of their products, increase the ease with which their molds are checked and most importantly, save money in the long run.
A typical mold might have taken two hours to measure in the past. The very same mold can now be measured in 15 or 20 minutes thanks to the flexibility of their FARO solution. Owner Ernie Dettmer estimates that the time shaved off of the inspection process and elsewhere saved his company almost $7,000 in the first four months of using the solution, but admits that “it’s hard to put a value on the amount of work the CMM has saved us.”
Precise is quick to evangelize on the benefits of accurate and portable CMM measurement tools. The technology has saved them thousands of dollars and industry-wide has likely saved other companies many thousands of dollars more. It is imperative that injection mold producers implement accurate and repeatable measurement practices at their facilities in order to ensure product quality, and a portable CMM like the FaroArm is one way to do it. Precise has learned the benefit of, well, precision. The sooner that more get that message, the better off we’ll all be.
Related Content
Quality Control Technologies Geared for Injection Molds
These latest technology solutions, from noncontact gages to test probes and automated inspection systems, aim to minimize production risks and ensure optimal quality control practices for moldmaking.
Read MorePrecision Meets Innovation at IMTS 2024
After attending IMTS, it's clear that the integration of advanced technologies is ready to enhance precision, efficiency and automation in mold manufacturing processes. It’s a massive event, so here’s a glimpse of what the MMT team experienced firsthand.
Read MoreThree 3D Scanner Investment Considerations
Mold builders taking advantage of laser and software advancements for portable 3D measurement tools can reduce inspection and measurement times.
Read MoreIndiana Mold Builder Decatur Mold Offers a History of Grit and a Future of Innovation
Decatur Mold Tool and Engineering Inc. serves as a tooling tour guide, helping busy tooling managers reduce uncertainty, lighten workload.
Read MoreRead Next
Take Measurement to the Tool
A portable CAM measurement system cuts inspection times by 84 percent, improves accuracy and conducts tooling capability studies.
Read MoreHow to Use Strategic Planning Tools, Data to Manage the Human Side of Business
Q&A with Marion Wells, MMT EAB member and founder of Human Asset Management.
Read MoreAre You a Moldmaker Considering 3D Printing? Consider the 3D Printing Workshop at NPE2024
Presentations will cover 3D printing for mold tooling, material innovation, product development, bridge production and full-scale, high-volume additive manufacturing.
Read More


.jpg;maxWidth=300;quality=90)


