Ready-To-Go Molds
By properly designing and building molds that are ready-to-go, moldmakers can shorten leadtimes and stay competitive.
"I'm a great moldmaker. I know my trade. My company has great people, the best equipment and we can cut anything. We know how to design a mold and build up complex hot runner systems. Anything you want in a mold we can do. We are proud of ourselves. We also can deliver quickly. All we want to do is to be able to get a fair price for our tools, send them to the molder and get paid. What else should we expect?"
That's the moldmaker's point of view. If you are typical in the moldmaking trade, you love to cut steel and you know how to do it. You know all the normal conventions and tricks of the trade, but it's not enough. In today's world you have to put on the customer's moccasins and stand by the molding machine and think like he does.
The molder that orders your mold is under tremendous strain today. He has to deliver good parts quickly. He must deliver 100 percent good parts in a lean, just-in-time environment, which means a lot of mold changes, short leadtimes and shrinking margins. What the molder needs from you is a ready-to-go mold.
Defining the Ready-to-Go Mold
A ready-to-go mold can be defined as a mold that can be put in the press, set up by the least qualified molding technician on the molding floor without breaking the normal molding rules. It can make parts predictably and quickly, so that the mold can be set up on cycle and allowed to run unattended without adjustment throughout the run.
Wow! Well, if molds are properly built and properly trialed this can and must be accomplished if a molder is to stay competitive. If you want your customers to survive and thrive in this market, you must be a partner for ready-to-go molds.
Mold Tryout
How do you get a ready-to-go mold? Obviously, it starts with good design with no broken rules. It must be cut properly. It must be assembled properly. Checks must be made to ensure that all items function as designed, clearances are proper and water lines are correct based on flow. Then the mold must be challenged with what is called a rigorous mold tryout, which sounds pretty formidable, but actually is the simplest way to try out a mold. Ultimately, everyone benefits—especially the moldmaker who wants to get paid and doesn't want problem molds coming back to haunt him.
Robust molds mean more business for and from your customer. All of these things happen if the mold is given a wringing out early on. If you were a NASCAR fan you wouldn't expect to put a car together, start it up, rev the engine a few times, drive around the block and expect to put it directly into a race. Obviously it must be trialed. It must be pushed harder than it is going to be used in the race. It must be tweaked and finalized so that on race day it is ready to go and not just built to print and sent off to the track.
What are the principles of a rigorous tryout? The rigorous concept is to challenge a mold early and avoid problems in production. You will treat the plastic in accordance with manufacturer's recommendations. In other words, you are not going to do anything bad to the material like overheat it. This means that when you try out a mold, you must set everything as conservatively as possible.
Plastic Temperatures
It starts out with the temperatures of the plastic. The temperature of the plastic coming out of the molding machine should be right down the middle of the manufacturer's spec. If you can run a mold here, you have some latitude down the road when things aren't so optimum. Setting up the molding machine to achieve this is important. It also is important that if you are using a hot runner mold, you set all of the temperatures throughout the manifold at the same temperature on the initial tryout. What temperature? The temperature of the front zone of the molding machine.
You should think of the front zone of the molding machine and the hot runner as a thermos bottle, which keeps the melt at proper temperature. By the time the material gets to this location it does not have to be heated further, but should simply be maintained at the proper melt temperature until transferred into each cavity. Only by doing initial tryouts with all temperatures set this way can the capability of a hot runner system be tested. If the mold can't be run this way, someone should dig in and find out why. In the long run this will get a mold to the customer that doesn't cause splay, black specks and other issues that can easily be covered up by your wizard tryout person who can jack temperatures and squeeze a good part out of a half-baked mold.
Filling the Mold
With the proper temperatures set, the mold must be filled as fast as consistently possible. This means that the mold should be able to be filled to at least 90 percent of the injection rate of the production molding machine without adverse effects. There are exceptions to this rule in areas such as lens molds, but you always want to have a mold that can be filled rapidly without adverse effects, even if you want to fill slowly later. This means that you shouldn't have jetting, burning or flash just because the mold is filled fast. Filling fast doesn't mean ramming the plastic into the end of the cavity. You must decouple the fast fill from the sudden stop. This molding technique should be used during all new mold tryouts.
Separating the fast fill from the sudden stop uses up the inertia of the fast flowing plastic before the cavity is full. The opportunity to look at fill balance is available by making a fill only shot where the mold is filled to a point of 90 to 95 percent.
This is the balance during flow, and is different than static or pack balance. Looking at short shots is really a key to doing a rigorous mold tryout.
The Instrumented Mold
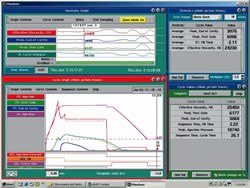
As part of a rigorous mold tryout, it is essential to instrument a mold to see what is going on inside the mold. Almost everyone goes to a mold tryout, stands around and hopes for the next part to be good after changing things without really knowing what is happening inside the cavity. Today it is so easy to look inside with sensors as opposed to simply guessing that it is almost negligence not to take a look. An instrumented mold allows you to look and see whether the mold can be packed properly without adverse effects.
Pressurizing the Mold
After filling you must pressurize the mold to get a good imprint of the cavity to minimize the effects of cooling. Short shots, sinks, voids and dimensional variations in parts are caused because of insufficient packing pressure in the mold cavities. Many times a mold is intentionally under packed to keep the mold from flashing. It is an easy way to squeeze some pretty good-looking parts out of a mold by packing gently with molder's finesse. However, in the long run it is going to cause problems.
It is important that any new mold be packed to a minimum pressure of 3000 psi or 200 mpa at the end of the cavity. Any mold that cannot be pressurized to this degree at the last area to fill will most likely be problematic. This does not always mean that every mold is run at this pressure. In some cases it might be run at a lower pressure to get dimensions or save material; however, the 3000 psi minimum is a really good number to ensure that there is sufficient pressure to keep the short shots out of the system. It is important to also know that the mold can be run at this pressure, or higher if necessary.
The higher the mold can be pressurized without adverse effects, the better the tool is built. In large molds it is sometimes difficult to achieve this result and mold builders are pretty upset when their mold fails. However, once you figure out the cause and fix it, you're happy because not only did you learn something, but your customer likes the mold, which is one of the keys to success in this industry.
Seal the Gate
It also is important during the time you are packing the mold, to observe whether or not the gate is sealed. This is an area that causes a lot of trouble with new tools. They are absolutely sure—based on the long hold time they have used in the process—that the gates are sealed, or they know they have valve gates and shut them off so the gate has to be sealed.
Oftentimes reality is different. Looking at pressures in the mold and seeing whether or not they are maintained after hold pressure is removed is the simplest, most effective way to determine gate seal. While weight can be used in many situations, it is no substitute for seeing what is going on when the injection pressure drops.
It also is important to look at the balance of packing—not just of fill. Looking at the pressure gradient across the mold or across cavities provides an understanding of why some areas or parts are different. Shrinkage is inversely related to the pressure during packing—more pressure in the cavity means less shrinkage; less pressure in the cavity means more shrinkage.
Cooling
Once the mold is packed, you have to be sure that you have good cooling. Cooling is about 80 percent of the cycle, making challenging the mold cooling system very important. Checking each cooling channel to ensure that proper flow is achieved, in addition to developing a mold surface map of temperatures is key. Knowing the actual temperature of the mold at every key location gives you an eye into how each area of the mold is cooled. If each area of a mold is at its proper temperature during a mold tryout then all that is necessary is to duplicate and maintain it during the molding process. Only by generating information regarding the mold surface temperature can you ensure that you have a ready-to-go mold that is adequately cooled. You then have enough data to duplicate cooling when you take the mold to production.
Run to Cycle
Finally, you must be able to run to cycle, eject the parts in one ejection stroke and, if automation is used, the parts must be easily removable every time—first shot to last shot, no exceptions. If the part is allowed to fall, one ejection stroke is all you are allowed.
When you get to this point, you can start to think about releasing the mold for a qualification run. Most molds are simply shot with a few shots then sent to the molder. The difference between the ready-to-go mold and those that are simply thrown over the wall is the difference between those that show up and those who win at Daytona. What kind of pit crew do you want to be for the molder? It might make the difference between surviving and thriving in these demanding times.
Related Content
Dynamic Tool Corporation – Creating the Team to Move Moldmaking Into the Future
For 40+ years, Dynamic Tool Corp. has offered precision tooling, emphasizing education, mentoring and innovation. The company is committed to excellence, integrity, safety and customer service, as well as inspiring growth and quality in manufacturing.
Read MoreMold Design Review: The Complete Checklist
Gerardo (Jerry) Miranda III, former global tooling manager for Oakley sunglasses, reshares his complete mold design checklist, an essential part of the product time and cost-to-market process.
Read MoreEditorial Guidelines: Editorial Advisory Board
The Editorial Advisory Board of MoldMaking Technology is made up of authorities with expertise within their respective business, industry, technology and profession. Their role is to advise on timely issues, trends, advances in the field, offer editorial thought and direction, review and comment on specific articles and generally act as a sounding board and a conscience for the publication.
Read MoreMaking Quick and Easy Kaizen Work for Your Shop
Within each person is unlimited creative potential to improve shop operations.
Read MoreRead Next
Designing the Mold: The Foundation for Success
The impact of different mold materials with regard to cooling; how to determine waterline placement for optimum cooling; placing cooling where heat is concentrated in the part; and, how to select a mold base sized for the machine being used.
Read MoreAre You a Moldmaker Considering 3D Printing? Consider the 3D Printing Workshop at NPE2024
Presentations will cover 3D printing for mold tooling, material innovation, product development, bridge production and full-scale, high-volume additive manufacturing.
Read MoreHow to Use Continuing Education to Remain Competitive in Moldmaking
Continued training helps moldmakers make tooling decisions and properly use the latest cutting tool to efficiently machine high-quality molds.
Read More
