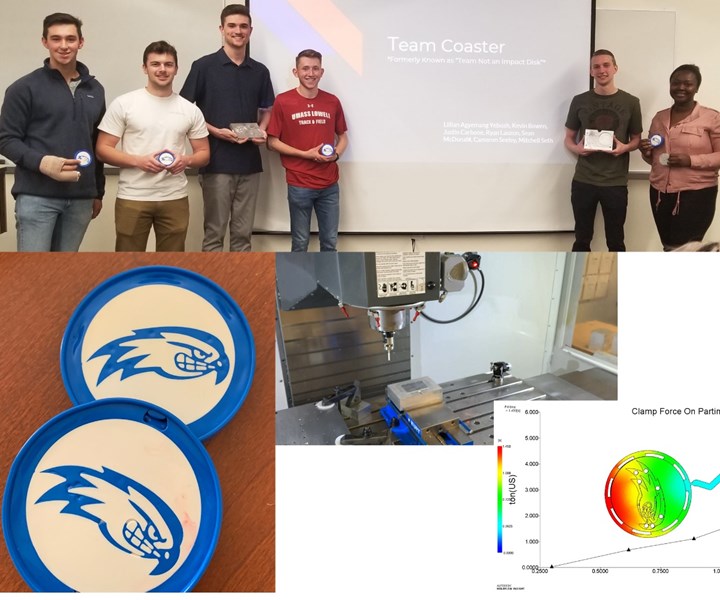
Examples of student projects in a typical year. Images courtesy of UMass Lowell.
Instructors within the Plastics Engineering program at the University of Massachusetts Lowell have been teaching mold design and engineering to undergraduate students for more than 60 years. However, the unexpected arrival of the COVID-19 pandemic this past March forced us to revisit our class program and objectives. Similar to other academic courses, the class became virtual. This meant redesigning an intensive hands-on class into one that could be taught and attended from home offices while maintaining academic rigor and continuing to meet critical student learning objectives.
The timing of the pandemic meant that students, who were completing tooling split designs and starting CNC programming, could not move forward with machining, assembly and molding. Instead, their projects became virtual learning experiences. Here, we share ideas that we implemented within our teaching to introduce young engineers to the world of injection mold design … virtually.
Through this pandemic, we have learned new approaches to teaching mold design that we would not have had the opportunity to explore under normal circumstances.
The Mold Engineering class is one of the most unique and appreciated classes in the curriculum. Recent feedback from the Accreditation Board for Engineering and Technology (ABET) feedback has confirmed it the premier design experience in the university’s undergraduate curriculum. Over the 13 weeks of a typical semester, teams of five to seven students (approximately eight teams per semester) have the opportunity to design a plastic part, analyze and design the mold, manufacture soft prototype tooling and ultimately produce parts by injection molding.
The projects provide students with hands-on experience in mold design using CAD, CAE tools for process simulation and CAM for CNC programming, as well as mold manufacturing and injection molding. The program requires all students to run each machine under the supervision of instructors and teaching assistants, so they learn how mold manufacturing processes constrain the design of plastic parts.
Further, instructors evaluate students based on technical presentations they deliver as a team in front of the whole class. Examples of projects and molds manufactured by students include UMass Lowell-themed gadgets, toys and other fun and useful parts. The hallmark mold design project has been a significant part of the class for over a decade, and the quality of parts produced by students has increased to the point that our Student Chapter of the Society of Plastics Engineers (SPE) now manufactures and sells these parts at the UMass Lowell Bookstore with profits supporting student activities.

Example of supporting calculations to validate mold design. Image courtesy of Popsicle Maker team.
Overcoming Virtual Learning Challenges
When the pandemic arrived, teaching a hands-on design class and making it a significant virtual experience for students posed many challenges. The teaching staff had to work hard to pivot the class—with one week’s notice—into a rigorous and interactive design experience. The hands-on component of the Mold Design class is critical , representing the opportunity for plastics engineering undergraduates to blossom as design engineers. Understanding we could not replicate that exact experience, we built up other elements to continue students’ evolution as designers.
We decided to pivot the class to focus on: 1) detailed mold design with supporting hand calculations, 2) further and more advanced CAE analysis, and 3) CAM generation with fully virtual validation. Changing the requirements and expectations for the team projects pushed students to perform engineering analyses of their prototype molds and use state-of-the-art CAD, CAE and CAM software for quick design iterations and effective reporting. Also, the use of hand calculations and verification of simulation results reinforced understanding of the design details. This occurred simultaneously while student worked in teams and met numerous deadlines and toll-gates in the design process.
We decided to pivot the class to focus on: 1) detailed mold design with supporting hand calculations, 2) further and more advanced CAE analysis, and 3) CAM generation with fully virtual validation.
The first major goal we introduced was the optimization of the cooling system to control part warpage and dimensional quality. In typical years, students work with a standard mold base in which cooling lines run straight through the top clamp plate and support plate. This simplification was necessary to keep the project manageable within a 13-week semester but has resulted in significant warpage issues, especially for parts with tall standing cores. This year, students were required to design and analyze a cooling system for their inserts to achieve a more uniform mold surface temperature by using standard catalog components such as plugs, nipples, fittings and baffles.
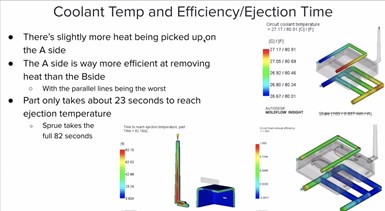
Example of CAE analysis of the cooling system design.
Designing an efficient cooling circuit that avoided conflicts with other mold components such as ejector pins, presented a new design challenge for students. Teams generated multiple CAD iterations using Solidworks to assemble components into the standard mold. Then, using CAE tools provided by Autodesk Moldflow, students were able to run complete cool, fill, pack and warp injection molding simulations. Their focus was on gate location and flow analysis for defect detection/prevention, warpage mitigation and cycle time optimization. Subsequent discussion of simulation results with the teaching team helped teams iterate their designs and optimize solutions.
The other primary task required students to use Mastercam for the generation of tool paths for machining. The teams, using a shared tool library, had to program all of the operations required to machine their core and cavity inserts using a three-axis Haas milling machine. Starting from rough 5-inch by 7-inch blocks of virtual stock, each team defined the operations required for facing, roughing, rest roughing and finishing. Students drilled and reamed ejector pinholes, and cut the runner system. Then they validated the virtual tool paths against the CAD model to visualize their machining strategies and optimize run time.
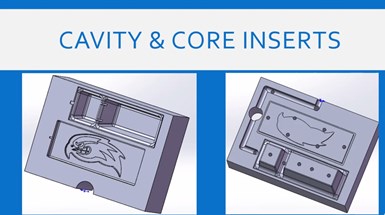
Example of core and cavity inserts with runner layout, runner shut-off and ejector pin locations. Image courtesy of Dunkaroos Team.
Through this pandemic, we have learned new approaches to teaching mold design that we would not have had the opportunity to explore under normal circumstances. The virtual delivery of lectures and lab activities, offered through video recording technology, allowed us to provide students the same practical demonstrations and real-world examples that we would typically use in class. This included video lectures on theory, examples of real molds and components and demonstrations of machining operations. Similarly, software tools typically taught in a computer lab were instead taught in a series of application-specific video tutorials.
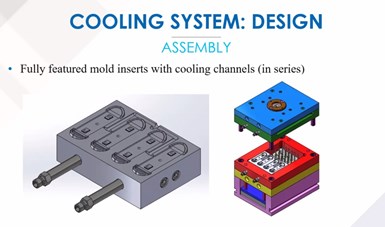
Example of designed multi-cavity mold insert and mold base. Image courtesy of the RowdyBoard Team.
Pre-recorded virtual lectures and labs shifted the role of the teaching staff, enabling new forms of communication and interaction with students. Class time transitioned to virtual office hours, where we could tailor our teaching to small groups of students to deepen their mold design experience. Zoom meetings became an opportunity to focus one-on-one and provide direct help and assistance with students’ designs. Usually, the on-campus lab environment is very demanding for students (and instructors) due to the level of activity with multiple ongoing projects.
Given the circumstances, the overall experience was positive and productive, and aspects of the virtual class will be incorporated into future on-campus offerings.
Everyone is collectively concerned about machining mold inserts on a tight schedule (the milling machine is usually cutting 24/7 for three weeks in April!) and performing multiple fabrication tasks. In the lab, student teams typically split their focus between the multiple steps associated with making their mold design a reality and safely using the equipment. In the virtual format, we had the opportunity to dive deeper into many steps of the mold design process. For example, we could interact with individual students to scroll through catalogs of components, discuss the details of assembling an ejector sleeve, or define the draft angles required for a side action.
Measuring “Remote” Success
Overall, virtually teaching a subject that relies on significant laboratory experiences such as mold machining, polishing, assembly and molding has undoubtedly proven to be a challenge. Instructors and students were challenged to pivot into a new format that placed greater responsibility on everyone involved. The response from the students was outstanding, and they demonstrated their ability to meet deadlines, communicate professionally, maintain a connection with team members and deliver virtual technical presentations. This has been remarkable, considering the responsibility and discipline required by virtual learning.
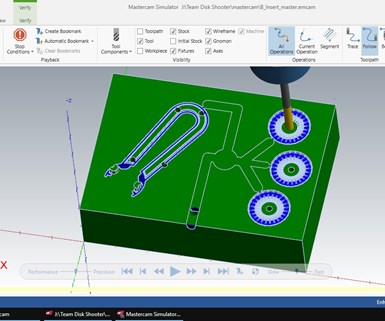
Examples of a material check for the generated CAM program. Image courtesy of the Disc Launcher Team.
Given the circumstances, the overall experience was positive and productive, and aspects of the virtual class will be incorporated into future on-campus offerings. For example, our new archive of video lab tutorials could be used to prepare students for on-campus labs, so they arrive more prepared to discuss their team’s mold designs.
However, this new virtual experience does not replace the hands-on experience that we want our students to have in a mold design class. As instructors and passionate mold designers, we cannot wait to be back in labs with the class, helping everyone succeed with their projects. We want our students to smell the cutting fluid as the CNC machine manufactures their inserts, feel the grit as they polish their inserts to a shine, hear the cadence of the molding machine running on an automatic cycle and see their finished products in their own hands.
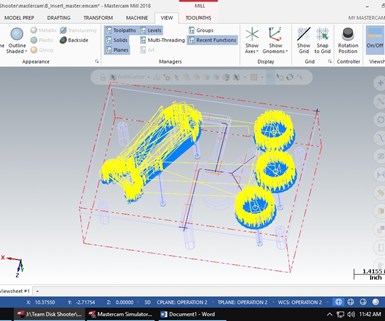
Examples of a material check for the generated CAM program. Image courtesy of the Disc Launcher Team.
Student satisfaction at the end of the semester when they hand off their parts to the class is unique and irreplaceable. The primary learning experience is manufacturing original plastic parts using mold inserts that they have created as a team from scratch. The expansion of virtual or online education, which is a timely topic, will continue to open up new opportunities for improvement; however, it is always going to be a different learning experience.
Related Content
Hands-on Workshop Teaches Mold Maintenance Process
Intensive workshop teaches the process of mold maintenance to help put an end to the firefighting culture of many toolrooms.
Read MoreMachining Center Spindles: What You Need to Know
Why and how to research spindle technology before purchasing a machining center.
Read MoreThe Benefits of Hand Scraping
Accuracy and flatness are two benefits of hand scraping that help improve machine loop stiffness, workpiece surface finish and component geometry.
Read MoreMold Design Review: The Complete Checklist
Gerardo (Jerry) Miranda III, former global tooling manager for Oakley sunglasses, reshares his complete mold design checklist, an essential part of the product time and cost-to-market process.
Read MoreRead Next
2020-2023 Editorial Advisory Board: Meet New Board Member Davide Masato Ph.D.
The 2020-2023 version of MoldMaking Technology's EAB features a new crew of 12 industry professionals. Here's one of them.
Read MoreAre You a Moldmaker Considering 3D Printing? Consider the 3D Printing Workshop at NPE2024
Presentations will cover 3D printing for mold tooling, material innovation, product development, bridge production and full-scale, high-volume additive manufacturing.
Read MoreHow to Use Continuing Education to Remain Competitive in Moldmaking
Continued training helps moldmakers make tooling decisions and properly use the latest cutting tool to efficiently machine high-quality molds.
Read More


.jpg;maxWidth=300;quality=90)


