Unbalanced Perceptions
You may not realize it, but a balanced toolholder assembly can help you get the most from your machine tools.
Do balanced tools increase productivity?
The effect of unbalance is one of the simplest physics theories for anyone to visualize. Consider what happens when you have too many wet towels on one side of your washing machine as it rotates. Or how your ride would be if you didn’t have balanced wheels on your car.
These scenarios are easy to imagine, but the effect of unbalance is not so evident when it comes to toolholders for milling applications because of several misunderstandings that have persisted for years within the moldmaking industry. On top of that, the benefits of balancing toolholder assemblies at all speeds are often simply overlooked.
A Balanced Look Back
It was the moldmaking industry that first identified the importance of running truly balanced toolholder assemblies. A toolholder assembly is made up of the toolholder, cutting tool, pull-stud if needed, nut, collet, etc. In the early to mid-‘90s, with machining centers able to run as fast as 15,000 rpm, there was a rash of spindle failures. The less-massive spindles on these high-speed machines and the extreme unbalance of most of the toolholders that were being used made unbalance the issue to be resolved.
In the early ‘90s, there was no known machine on the market designed specifically to accurately balance the toolholder assembly. Consequently, state-of-the-art companies attempting to stay ahead of the technology curve purchased balancing machines designed to balance parts such as rotors, wheels, crank-shafts, turbines, etc.—not toolholders. These balancing machines actually were unbalancing the assemblies, however, so customers did not see a noticeable difference when machining with their “balanced” toolholders.
In the late ‘90s, a balancing machine that truly balanced toolholder assemblies finally came to market. In addition, other balancing advancements introduced around this time included finer, “pre-balanced” toolholders, as well as toolholder systems that provide more consistent balance repeatability when changing cutting tools (i.e., shrink-fit toolholders). This combination of developments enabled moldmakers to accelerate and optimize their use of the newest high-speed technologies and produce molds with finer finishes, resulting in greatly reduced polishing and/or EDM work.
Even though the mold industry identified the need to use balanced toolholders for its high-speed applications two decades ago, the industry is still somewhat confused about the importance of running truly balanced assemblies.
A misconception about toolholder balancing is the perception that only using pre-balanced toolholders is sufficient. While using these pre-balanced toolholders is highly recommended, it does not guarantee full machine tool utilization. After changing cutting tools, measuring the unbalance of a toolholder assembly is essential to fully realize the maximum potential of all the machine tools in a shop. Even slower-rpm machines (ones that run at 8,000 rpm) can be used to their fullest potential if they are using balanced toolholder assemblies.
Finely balanced toolholder assemblies offer many advantages, including increased productivity, safety, and long cutting tool and spindle life. Only when the toolholder assembly demonstrates a precise concentricity and balance can the optimal cutting conditions be utilized. In this case, the rule of thumb is: Too much balance is better than not enough.
What happens to the unbalanced holders already in the plant? Although in practice it is impossible to avoid mixing balanced and unbalanced holders, keep in mind that a single machining process with an unbalanced holder at a high rotational speed can undo required machining accuracy and damage the spindle. For this reason, toolholders should be balanced, preferably in the plant itself. If not, it is advised to make toolholder balancing a part of goods reception and quality control. Let’s face it, how do you know what condition your toolholder assemblies are in unless you have a machine to check them?
Causes and Consequences of Unbalance
Unbalance is caused by uneven weight distribution during rotation, which creates centrifugal forces that increase to the square with the rotational speed. This means that if the unbalance is the same, the spindle creates a 25-times-higher centrifugal force at a rotational speed of 10,000 rpm than at a rotational speed of 2,000 rpm. As a result, an unbalance in toolholder assemblies has a particularly noticeable negative effect on high-speed machining, and on heavy tools or cutting tools with complex geometries.
A main consequence of unbalance is this centrifugal force that puts a strain on the spindle bearings, which can cut spindle lifetime in half. As a result, the use of balanced tools is always recommended; otherwise, spindle warranties are nonexistent or limited.
Another consequence is the vibration that is created when the effective direction of the centrifugal force changes as the spindle rotates. These vibrations are transferred throughout the whole machine and cutting tool, reducing cutting tool life. It has been reported that the tool life of an unbalanced toolholder assembly is decreased by 10 percent, on average, which results in increases in cutting tool costs.
These vibrations are not only harmful to the spindle and the cutting tool, they also impair the reliability of the entire process and are transferred to the outcome of the machining. Vibrations create chatter marks that have to be removed by additional fine machining or hand work.
To reach the correct process reliability level and achieve the final results demanded, vibrations must be reduced. One method for doing so requires reducing spindle speed, feed
rate and cutting depth. This can lead to smoother cutting, but also decreases metal removal rates and productivity.
Investment Intel
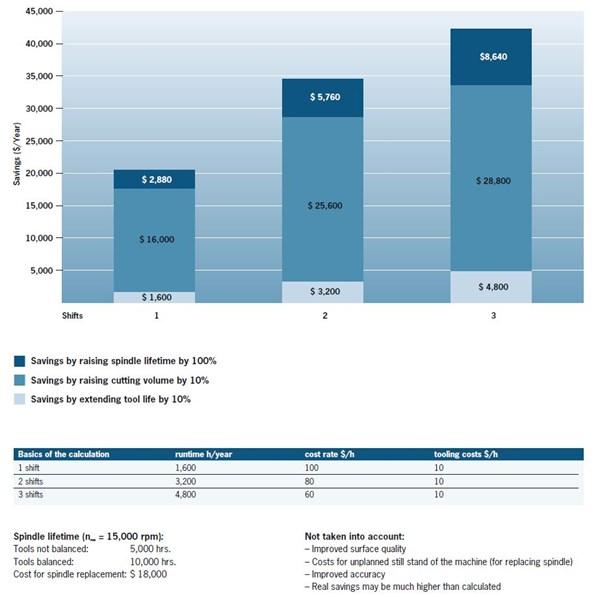
The problem with decreased metal removal rates and productivity becomes clear after a simple analysis: A machining center costs $100 per hour to operate (one-shift operation, 1,600 operating hours per year). With a 10-percent increase in metal removal time, you save $10 per hour, which equals $16,000 per year.
Another benefit of balanced toolholder assembly is increased spindle life, which is key for cost savings and machine reliability. It enables spindle replacement to be planned, eliminating unplanned machine downtime. A truly balanced system can realize savings of more than $20,000 per year, per machine. And this does not even include additional savings that can be realized from improved part surface quality, increased size accuracy, and fewer machine breakdowns or downtimes.
These figures put the objection over the cost of a balancing machine into perspective. One could argue that an investment is only expensive when it does not pay for itself quickly enough or at all. The aforementioned calculations show that a balancing machine can, in fact, pay for itself very quickly. And keep in mind that a single machining process with an unbalanced holder at a high rotational speed can undo required machining accuracy and damage the spindle. Consider that a spindle replacement alone can cost more than a balancing machine. Figure 1 illustrates the annual savings potential per processing center for one-, two- and three-shift operation.
Figure 1 - Potential cost savings per machining center that can be achieved through proper balancing.
Measurement Tests
Measuring a toolholder assembly’s balance is necessary to guarantee a consistent machining process. Typically, when using a truly balanced assembly, no further fine balancing is needed after adding a cutting tool, especially in shrink-fit chucks.
Finely balanced toolholders are a step in the right direction. However, what effects do the cutting tools or face mill cutters have on the total unbalance of the assembly? To answer this question, let’s review this simple measurement test:
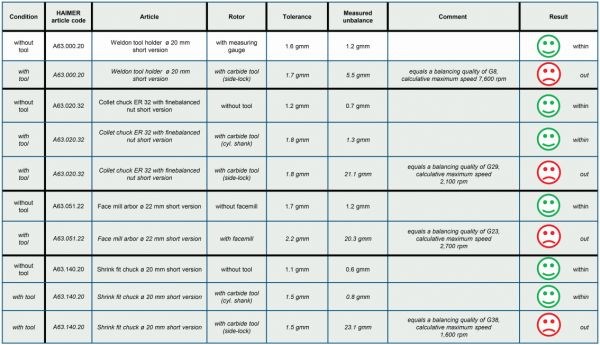
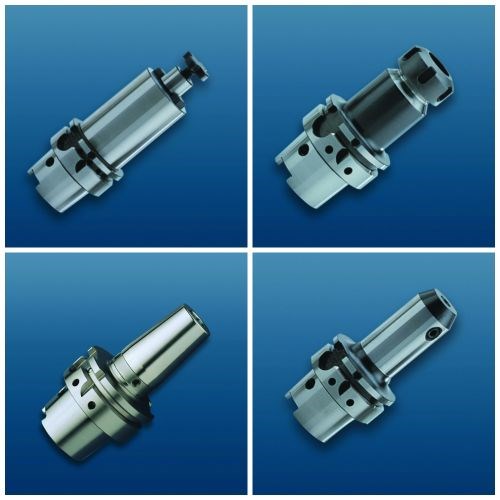
Measurements were performed on a tool dynamic balancing machine with a Weldon chuck, a collet chuck and a shrink-fit chuck, along with a face mill cutter (see Figure 2). All are finely balanced products with a shaft diameter of 20 mm in the short version. The measuring requirements were a balance rating of G = 2.5 at operating rotation speed of 25,000 rpm/measuring process on one plane (static).
Initially, the unbalance on four different toolholder types was measured (i.e., without cutting tools). As expected, the unbalance of the holders was constantly within the tolerance limits. Subsequent measurements with cutting tools in these finely balanced holders showed clear unbalances, especially for tools with clamping flats, which are in widespread use today.
No appreciable unbalance was found in assemblies holding tools with cylindrical shafts and with symmetrical tool geometry in shrink and collet chucks. The values measured were at 0.8 or 1.3 gram millimeters (gmm). Tools with cylindrical shafts and symmetrical cutting edges only bore a small unbalance. The shrink-fit chucks do not have moving parts and clamp the tool centrally, and here, too, there was hardly any additional unbalance. With the collet toolholder, the clamping nut could have posed a problem because it is built unsymmetrically, but for this reason the nuts themselves are specially balanced.
In contrast, tools with clamping flats were not able to meet the balance requirements at all. Even with the Weldon toolholder, a real unbalance of 5.5 gmm was measured, which corresponds to a balance rating of G8. On a purely mathematical basis, this only allows a maximum rotational speed of 7,600 rpm. With collet chucks, a balance rating as high as G29 was determined for this cutting tool with a clamping flat, and for shrink chucks it was G38. This corresponds to maximum rotation speeds of 2,700 rpm and 1,600 rpm, respectively.
Even finely balanced shrink and collet chucks become considerably unbalanced when paired with unsymmetrical tools or tools with Weldon clamping flats. To work efficiently and accurately when machining, these tools must be re-balanced after each tool change.
Measurements of the face mill cutter produced similar results. With insert tools in operation, an unbalance of 20.3 gmm was determined, which corresponds to a balance rating of G23. This is because face mill insert cutters have parts that are clamped on and are not necessarily always located in the same place. The milling head has a large tolerance due to the makeup of its assembly (i.e., pins with bore holes and clearance fitting), so the tool’s position is not 100-percent defined.
These tests show that mutual balancing for cutting tool and holder is essential. Even with high-quality tools, a fine balancing is important for the total tool assembly.
Figure 2 - Test results of total unbalance in various tools.
Balancing Made Easy
Reservations still exist about balancing, but with the correct balancing machine and practice-oriented software, it should be quick and easy to achieve. In a nutshell, the operator puts the holder in the machine and selects the appropriate requirements from the menu, then the machine walks the user through the remaining steps.
Any worker familiar with toolholders should be able to operate a properly designed balancing machine without extensive training. The specialist knowledge should reside in the machine, into which the necessary data about each tool has already been fed and stored, saving time and avoiding errors. Additional safety precautions can be provided via user administration. For example, you can limit rights to compile or change tool data to designated personnel. Other users can be permitted access only to stored tools, and then may proceed with balancing according to the set requirements.
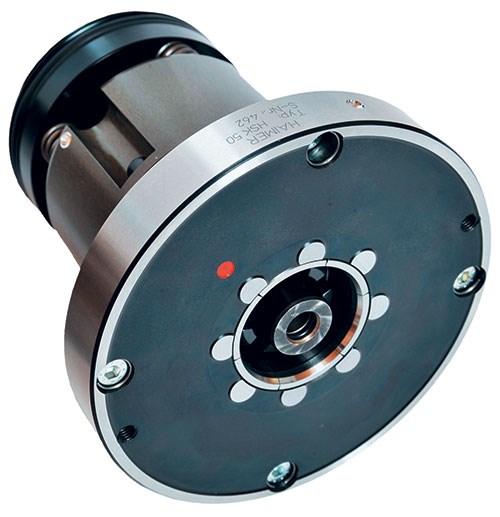
The balancing process is a largely automated one in which the toolholder is clamped in the balancing spindle and set in rotation, then measurements are taken. Force sensors on the balance spindle measure the centrifugal forces caused by unbalances.
The software then evaluates the measurements and shows the operator how much material should be removed or added, or where to displace weight in order to compensate for the unbalance.
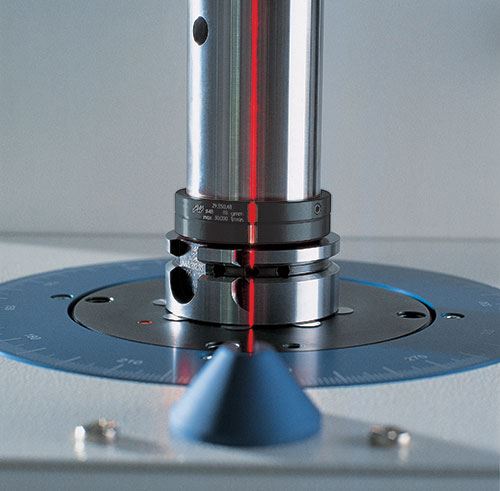
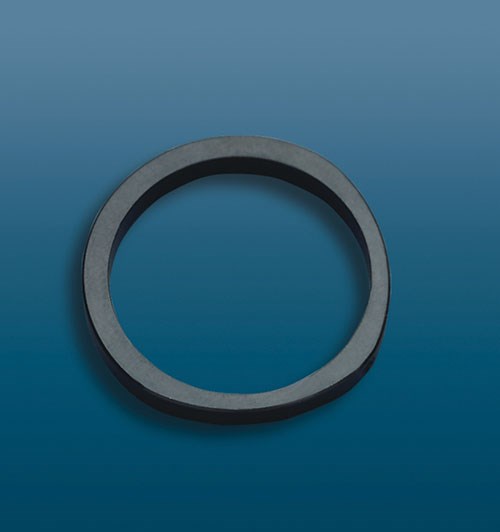
Balancing machines also offer various other options the user can employ to remove unbalance. For example, as an alternative to drilling off material, balancing screws or rings can add weight. With this tactic, two rings that belong together and have a defined unbalance are clamped on a cylindrical portion of the toolholder to compensate for unbalances. The software then provides the exact angle to which the rings should be turned. An available line laser shows the rotation position directly on the machine.
Measuring takes one minute at the most, and if you work with balancing rings or screws the whole process can be completed in two minutes. If you have to resort to a drill on the toolholder to even out the mass, it may take slightly longer.
A Clearer Perception
Advancements in balancing technologies have made balancing a toolholder assembly quick, simple and accurate, enabling you to truly get the maximum from your machine tools. You just need to remember the basic physics concerning balance, and then apply that to the balancing process. Then all misconceptions should fade away.
To view a video featuring offline balancing of tool/toolholder assemblies for
high-speed machining centers, visit http://short.moldmakingtechnology.com/haimerbal.
Related Content
The Benefits of Hand Scraping
Accuracy and flatness are two benefits of hand scraping that help improve machine loop stiffness, workpiece surface finish and component geometry.
Read More6 Ways to Optimize High-Feed Milling
High-feed milling can significantly outweigh potential reliability challenges. Consider these six strategies in order to make high-feed milling successful for your business.
Read MoreThe Ins and Outs of Hot Runner Temperature Control
A training checklist that explains the why and how of proper hot runner temperature control and system management.
Read MoreMoldmakers Deserve a Total Production Solution
Stability, spindle speed and software are essential consideration for your moldmaking machine tool.
Read MoreRead Next
How to Use Continuing Education to Remain Competitive in Moldmaking
Continued training helps moldmakers make tooling decisions and properly use the latest cutting tool to efficiently machine high-quality molds.
Read MoreAre You a Moldmaker Considering 3D Printing? Consider the 3D Printing Workshop at NPE2024
Presentations will cover 3D printing for mold tooling, material innovation, product development, bridge production and full-scale, high-volume additive manufacturing.
Read MoreReasons to Use Fiber Lasers for Mold Cleaning
Fiber lasers offer a simplicity, speed, control and portability, minimizing mold cleaning risks.
Read More


.png;maxWidth=300;quality=90)




.png;maxWidth=970;quality=90)